Halloween is the time of year when creativity meets sugar, and nothing says festive fun like a tray of cake pops decorated as pumpkins, ghosts, or little monsters. According to the National Confectioners Association, over 65% of Americans celebrate Halloween with candy or desserts, making themed sweets one of the most shared items at parties.
Cake pops are a genius dessert because they’re bite-sized, portable, and customizable. They’re also perfect for kids and adults alike since you can go simple or extra with your decorations.
Pro Tip: Cake pops can double as table décor. Arrange them in a spooky stand or a carved pumpkin for an Instagram-worthy centerpiece.
What you’ll need for this Halloween cake pops recipe
Before diving in, let’s gather everything. Having your ingredients and tools ready makes the process smoother and way less messy.
Ingredients
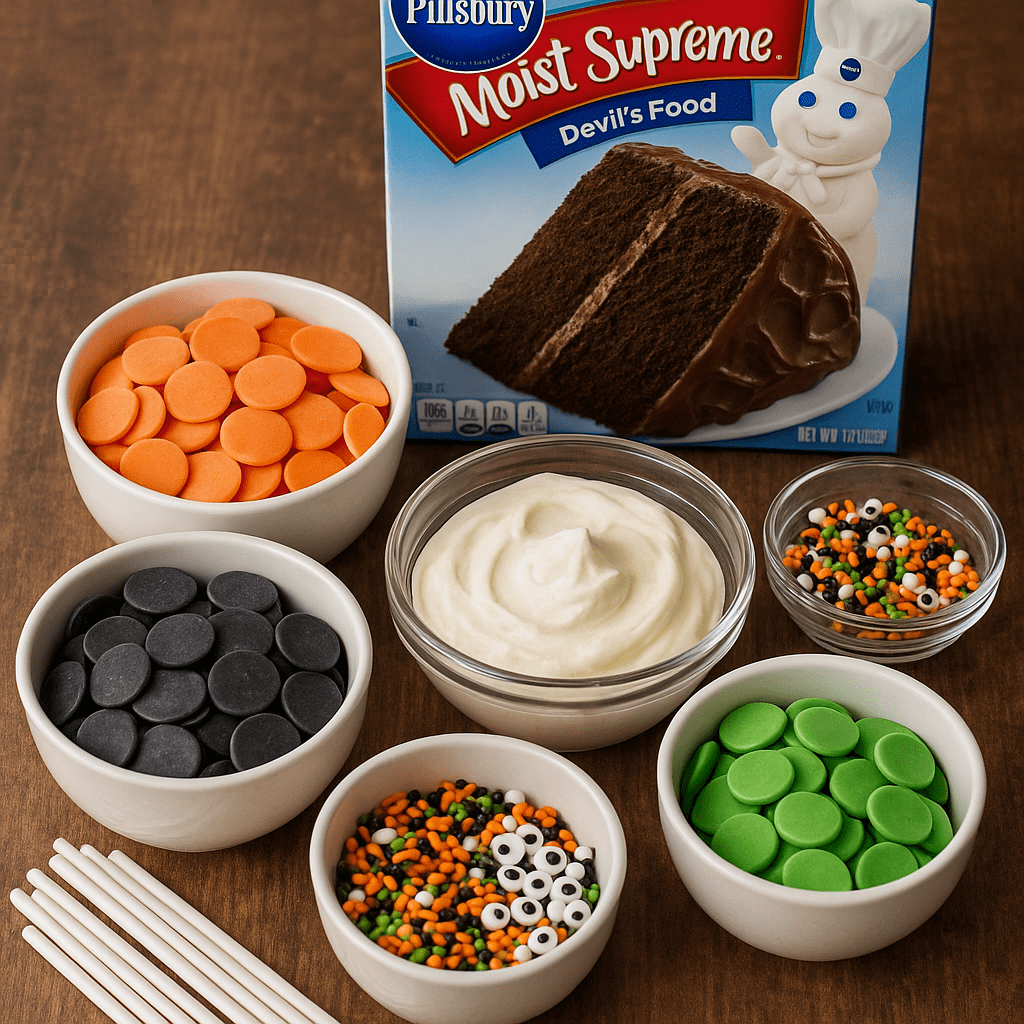
- 1 box of chocolate or vanilla cake mix (plus ingredients required on the box)
- 1 cup of frosting (cream cheese or buttercream works best)
- 12 oz candy melts (orange, black, white, or green)
- Lollipop sticks or paper straws
- Sprinkles, edible glitter, or candy eyes for decorating
Tools
- Mixing bowls
- Baking sheet lined with parchment paper
- Styrofoam block or cake pop stand (for drying)
- Microwave-safe bowls for melting candy
- Spoon or cookie scoop for portioning
Pro Tip: If you don’t have a cake pop stand, use an upside-down egg carton or colander to hold the sticks upright while they set.
Step-by-step Halloween cake pops recipe
Making cake pops may look complicated, but once you break it down, it’s really just three stages: bake, shape, and decorate. Each step has a few tricks that make the difference between professional-looking pops and ones that fall apart.
Step 1: Bake and crumble
- Bake the cake according to package instructions. You can use any flavor you love, chocolate, vanilla, or even pumpkin spice for a true Halloween vibe. Follow the box or your recipe, making sure not to overbake, since dry cake will make your pops crumbly.
- Let the cake cool completely. This part is crucial. If the cake is even slightly warm, the frosting will melt when you mix it in, leaving you with a sticky, greasy mess. A good trick is to bake the cake the night before and let it rest overnight.
- Crumble the cake into fine crumbs. Break the cake apart with your hands, or pulse it in a food processor for a finer, more even texture. Aim for the consistency of breadcrumbs. This ensures the frosting mixes evenly and the cake balls hold their shape without big chunks falling out.
Pro Tip: If your cake has crispy edges or a domed top, trim those off before crumbling. They can make the mixture too dry and uneven.
Step 2: Mix and roll
- Add frosting to the crumbs, a spoonful at a time. You’ll usually need around 1 cup, but the exact amount depends on how moist your cake is. Less is more here, you can always add more, but you can’t take it out once it’s too sticky.
- Mix until the dough holds its shape when pressed. The perfect texture should feel like playdough, moldable, but not wet or sticky. If it crumbles, add a little more frosting. If it’s too soft, chill it for 10 minutes before rolling.
- Scoop portions with a cookie scoop and roll into balls. A 1-inch ball is the sweet spot, big enough to decorate but small enough to stay on the stick without falling off. Roll them between your palms until smooth.
- Place them on a lined tray and chill. Refrigerate for at least 30 minutes or freeze for 15 minutes if you’re short on time. Chilling firms them up and makes dipping much easier.
Pro Tip: If you’re making a big batch, keep half the tray in the fridge while you work on dipping the first batch. Warm cake balls are more likely to slide off the stick.
Step 3: Dip and decorate
- Melt candy melts in the microwave in 30-second bursts. Stir between each round until smooth. Don’t overheat, or the candy coating will seize and turn lumpy. If it feels too thick, add a teaspoon of coconut oil or vegetable shortening to thin it out.
- Dip the tip of each lollipop stick in the melted candy. Insert it halfway into each cake ball. This creates a “glue” that holds the cake to the stick, preventing disasters when dipping. Let the coating set for a minute before dipping the whole pop.
- Dip the cake pop into the melted candy, coating fully. Tilt the bowl slightly and dip at an angle for smoother coverage. Once dipped, gently tap the stick against the edge of the bowl while rotating to shake off excess. This helps avoid drips or uneven lumps.
- Add decorations while the coating is still wet. This is your chance to get creative, sprinkles, candy eyes, edible glitter, or themed sugar shapes all stick best when applied immediately.
- Stick them upright in a stand and let them set. Use a cake pop stand, Styrofoam block, or even a colander to keep them upright until the coating hardens completely. This usually takes about 15 minutes at room temperature.
Pro Tip: If you want to add detailed designs like mummy bandages or pumpkin ridges, let the first coat dry fully, then drizzle or pipe additional candy melt layers on top.
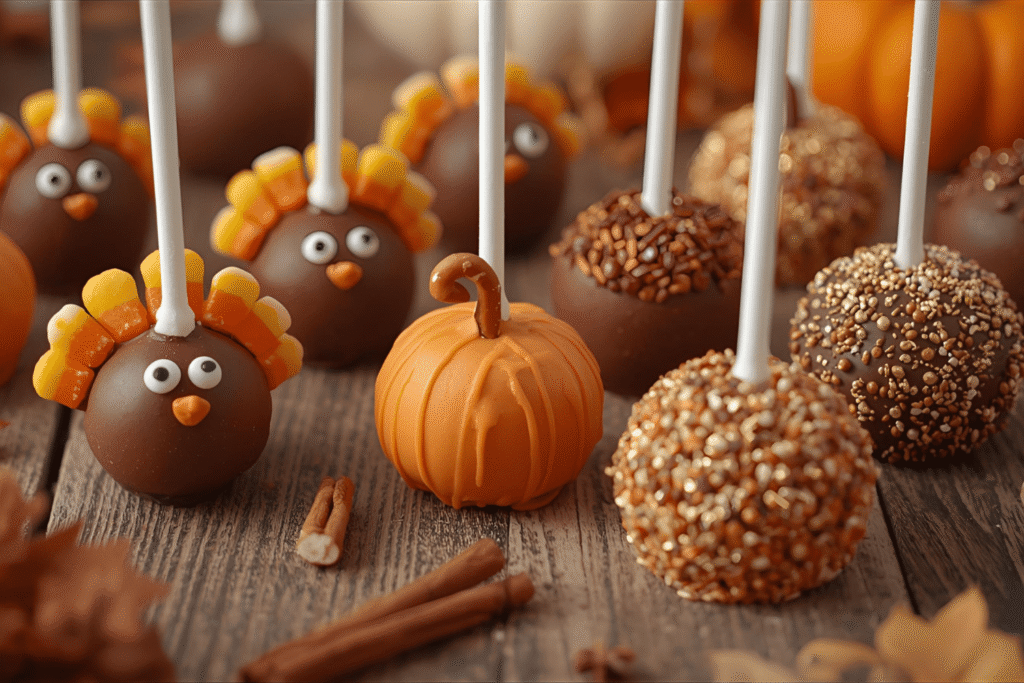
Fun Halloween cake pop decoration ideas
The beauty of this recipe is how versatile it is. You can theme your cake pops however you like. Here are some creative ideas:
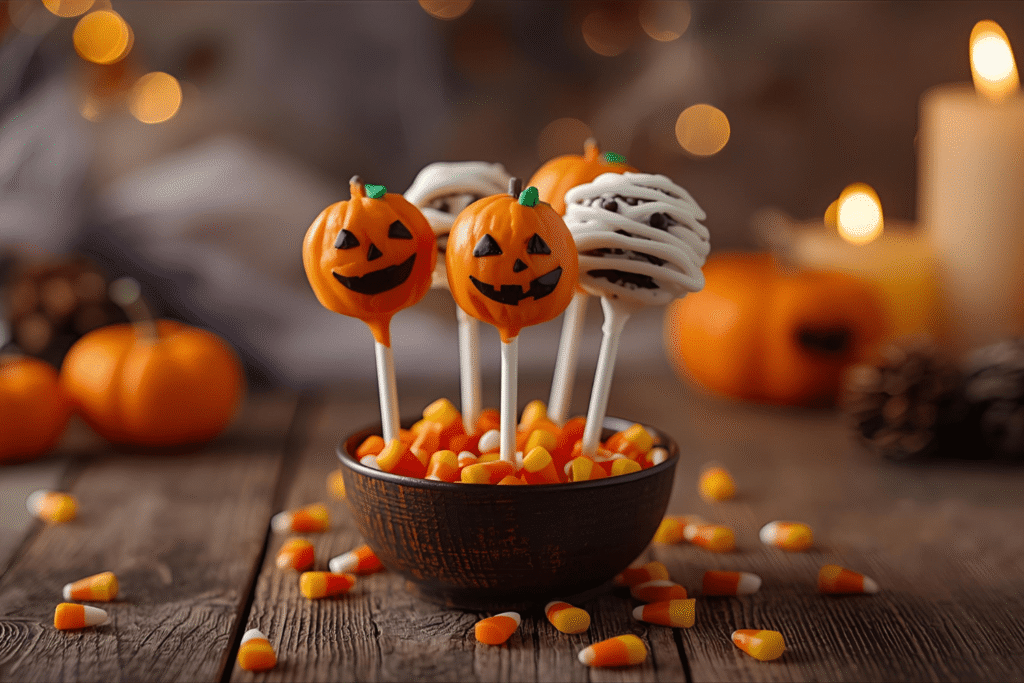
Pumpkin pops
- Dip in orange candy melts.
- Use green frosting or candy for the stem.
- Draw lines with a toothpick to mimic pumpkin ridges.
Ghost pops
- Dip in white candy melts.
- Add candy eyes or pipe small dots of chocolate for a spooky face.
Monster pops
- Go wild with colors like green, purple, and black.
- Add candy eyes in different sizes for a playful effect.
Mummy pops
- Dip in white candy melts, then drizzle extra white in crisscross lines.
- Add eyes peeking through the “bandages.”
Pro Tip: Buy edible markers to easily draw faces and details once the candy coating sets.
How to make your Halloween cake pops stand out
With so many Halloween desserts competing for attention, presentation is key.
- Serve them as favors: Wrap each pop in cellophane with a ribbon.
- Create a centerpiece: Stick cake pops into a carved pumpkin for a dramatic effect.
- Match your theme: If your party is more chic than spooky, stick to black and gold sprinkles instead of neon colors.
According to Pinterest trends, searches for “Halloween desserts” spike by over 400% every October, meaning unique, decorated pops are a guaranteed hit on social feeds.
Tips for perfect cake pops every time
Making cake pops can be tricky the first time. Here’s how to avoid common mistakes:
- Don’t add too much frosting, it makes the pops heavy and prone to falling off the stick.
- Chill before dipping, cold pops hold better and don’t crumble.
- Use the right candy melts, thinner coatings give a smoother finish. Add a teaspoon of coconut oil if your melts are too thick.
- Keep decorations light, too many heavy toppings can slide off.
Pro Tip: Always test one cake pop before dipping the entire batch. This lets you adjust your candy melt consistency.
Variations to try beyond Halloween
One reason cake pops are so popular is their adaptability. You can easily switch the theme for any occasion.
- Christmas: Dip in red and green melts, add white sprinkles for a snowy vibe.
- Valentine’s Day: Heart-shaped pops dipped in pink with edible glitter.
- Birthday parties: Rainbow sprinkles with bright-colored coatings.
This makes the skill of making cake pops valuable for any baker. Once you master them for Halloween, you can use the same method year-round.
How to store Halloween cake pops
Storage is essential if you want your pops to stay fresh for the big night.
- Room temperature: Store in an airtight container for up to 2 days.
- Refrigerator: Keeps for up to a week but let them sit out before serving so the coating doesn’t sweat.
- Freezer: You can freeze undipped cake balls for up to 2 months. Just thaw in the fridge before dipping.
Pro Tip: Never freeze fully decorated cake pops, as condensation can ruin the designs.
Healthier twists for guilt-free Halloween cake pops
If you’re trying to balance treats with health goals, you can lighten things up:
- Use a lower-sugar cake mix.
- Swap regular frosting with Greek yogurt frosting.
- Coat with dark chocolate instead of candy melts.
- Decorate with dried fruit or nuts instead of sprinkles.
Did you know? According to the CDC, nearly 40% of added sugars in the average American diet come from snacks and desserts. Making small swaps can still give you a festive dessert without the sugar overload.
FAQs
Absolutely! Homemade cake works beautifully, but make sure it’s not too moist or it may not hold its shape.
This usually happens if the cake balls are too cold compared to the melted candy. Let them sit at room temp for a few minutes before dipping.
Use a dairy-free cake mix, vegan frosting, and vegan-friendly chocolate coating. Brands like Enjoy Life offer great options.
Yes. Cake balls can be made and stored up to 2 days ahead in the fridge or a month in the freezer. Just dip and decorate closer to serving.
You’ll get about 20 to 24 cake pops from one standard box cake mix.
Final thoughts
This Halloween cake pops recipe is more than just a treat, it’s an activity, a decoration, and a guaranteed crowd-pleaser. With endless decorating possibilities, you can make them as spooky, cute, or chic as you like.
Whether you’re hosting a big costume party, surprising your kids, or simply want to impress friends at work, these bite-sized desserts will get people talking. Try them once, and you might just make Halloween cake pops your new yearly tradition.

24
servings30
minutes40
minutes200
kcalThese Halloween cake pops are the perfect spooky-sweet treat! Moist cake mixed with frosting, dipped in colorful candy melts, and decorated as pumpkins, ghosts, and mummies – fun to make, delicious to eat, and guaranteed to wow your party guests.
Ingredients
1 box of chocolate or vanilla cake mix (plus ingredients listed on the box)
1 cup frosting (cream cheese or buttercream works best)
12 oz candy melts (orange, black, white, or green)
Lollipop sticks or paper straws
Halloween sprinkles, edible glitter, or candy eyes for decorating
Directions
- Bake the cake according to package instructions.
- Let it cool completely before handling.
- Crumble the cake into fine crumbs using your hands or a food processor.
- Add frosting to the crumbs, one spoonful at a time.
- Mix until the texture is moldable, like playdough (not too sticky).
- Roll into 1-inch balls and place on a parchment-lined tray.
- Chill in the fridge for at least 30 minutes (or freeze for 15 minutes).
- Melt candy melts in the microwave in 30-second bursts, stirring until smooth.
- Dip the tip of each lollipop stick in melted candy, then insert it halfway into a cake ball.
- Dip the entire cake pop into the melted candy, coating fully. Tap gently to remove excess.
- Add sprinkles, candy eyes, or decorations while the coating is still wet.
- Place pops upright in a stand or Styrofoam block and let them set for about 15 minutes.