Halloween is all about fun, creativity, and just the right amount of spooky. While costumes and decorations set the mood, the food is what ties everything together. Sweet treats are always a hit, but if you want something easy to make, incredibly delicious, and guaranteed to wow your guests, Halloween Oreo balls are your best bet.
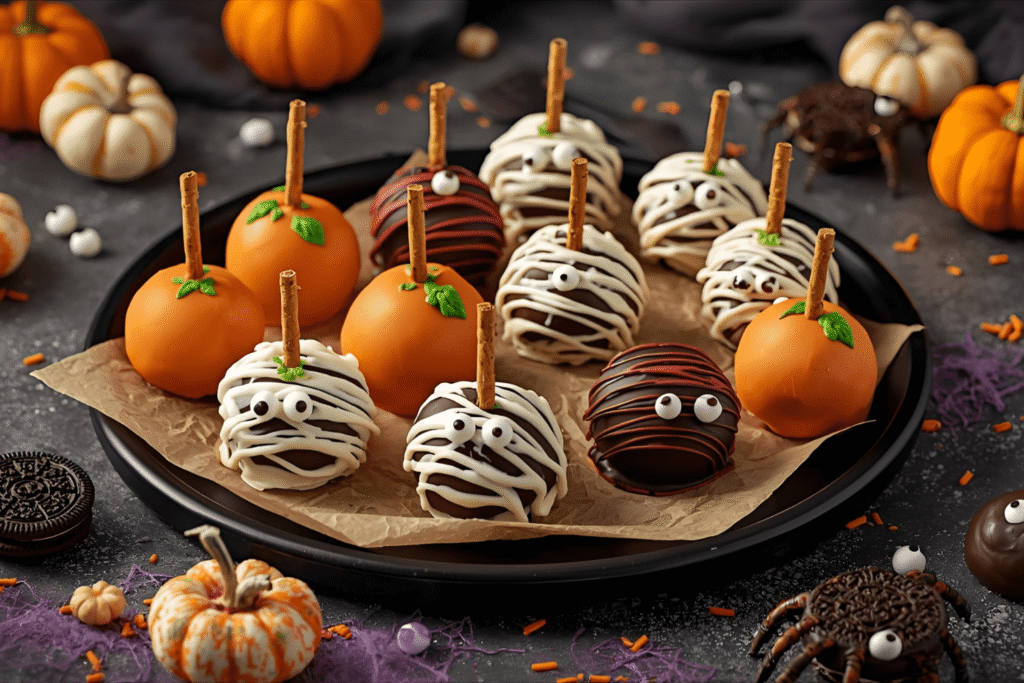
These bite-sized desserts combine crushed Oreos, cream cheese, and a smooth chocolate coating to create a rich and indulgent truffle-like treat. What makes them perfect for Halloween is the endless decorating potential. From mummy Oreo balls to pumpkin-shaped bites, you can transform this simple recipe into a spooky showstopper.
According to the National Retail Federation, 70% of people celebrating Halloween in 2023 purchased candy or sweets, making it one of the top spending categories for the holiday. Oreo balls fit perfectly into that trend, fun, shareable, and ideal for parties or trick-or-treat dessert tables.
What are Oreo balls
Oreo balls, sometimes called Oreo truffles, are a no-bake dessert made from just three base ingredients: Oreos, cream cheese, and chocolate. They’re rolled into bite-sized balls, chilled, and dipped in melted chocolate. From there, you can decorate them however you like.
For Halloween, you can turn them into:
- Mummies wrapped in white chocolate drizzle
- Pumpkins dipped in orange-colored chocolate with pretzel stick stems
- Eyeballs with candy eyes or icing details
- Spiders with candy legs and sprinkles
Pro Tip: Because this recipe requires no baking, it’s a fantastic one to make with kids. They’ll love crushing Oreos, rolling the dough, and decorating the spooky little monsters.
Ingredients you’ll need

For about 36 Oreo balls, you’ll need:
- 36 Oreo cookies (regular, not Double Stuf)
- 8 oz cream cheese (softened)
- 16 oz chocolate (white, milk, or dark depending on your designs)
- Food coloring (orange, green, red, or black)
- Pretzel sticks (for pumpkin stems or spider legs)
- Candy eyes or icing pens (for eyeballs and mummies)
- Sprinkles (Halloween-themed colors work best)
Optional:
- Black edible glitter for extra sparkle
- Mini peanut butter cups or M&Ms for monster decorations
Step-by-step instructions
Step 1: Crush the Oreos
Start by placing your Oreos into a food processor and pulsing until they turn into fine, sand-like crumbs. This is the fastest and most effective method to get a smooth base for your Oreo balls. If you don’t have a food processor, pop the cookies into a large ziplock bag, seal tightly, and crush them with a rolling pin or the bottom of a heavy pan. Take your time with this step, as bigger chunks of cookie can make the mixture harder to roll and dip smoothly.
Pro Tip: Reserve about 2–3 tablespoons of the crushed Oreos before mixing in the cream cheese. These crumbs make a perfect garnish for sprinkling on top of the finished Oreo balls, adding texture and that classic Oreo look.
Step 2: Mix with cream cheese
Transfer your Oreo crumbs to a large mixing bowl. Add the softened cream cheese, make sure it’s at room temperature so it blends more easily. Using a spatula, wooden spoon, or even your hands (gloves can help here), mix everything together until it forms a thick, dough-like consistency. The mixture should hold together when pressed. If it feels too sticky, chill it for 10 minutes before rolling. If it feels too dry, add a small amount of cream cheese until it comes together smoothly.
Step 3: Roll into balls
Line a baking sheet with parchment paper to prevent sticking. Using a small cookie scoop, tablespoon, or your hands, scoop out even portions of the mixture and roll them into balls about 1 inch in diameter. Try to keep them uniform so they look neat and set evenly when dipped in chocolate. Place each ball on the prepared tray. Depending on the size of your scoops, you should end up with around 36 Oreo balls.
Pro Tip: Lightly dampen your hands with water to stop the mixture from sticking while rolling.
Step 4: Chill
Once all the Oreo balls are rolled, place the tray in the refrigerator for at least 1 hour, or speed things up by freezing for 20 minutes. Chilling is essential, it firms up the mixture so the balls don’t break apart when dipped in warm chocolate. If you’re making these ahead of time, you can leave them in the fridge overnight and decorate them the next day.
Step 5: Melt chocolate
Place your chocolate in a microwave-safe bowl. Heat it in 30-second intervals, stirring between each round until smooth and glossy. Don’t overheat, as chocolate can burn quickly. You can also melt chocolate using a double boiler for more control. Add food coloring to match your designs: orange for pumpkins, white for mummies and eyeballs, green for monsters, or black for spiders. Candy melts are also a great option since they come in ready-made colors.
Pro Tip: Stir a teaspoon of coconut oil or vegetable shortening into your melted chocolate for a smoother texture and shinier finish.
Step 6: Dip and decorate
Working one at a time, drop a chilled Oreo ball into the melted chocolate. Use a fork or dipping tool to roll it around until fully coated, then lift it out and let the excess drip off. Gently tap the fork against the side of the bowl to remove extra chocolate. Place the coated ball back onto the parchment paper. While the chocolate is still wet, add your decorations.
Ideas:
- Pumpkin Oreo balls: Dip in orange chocolate, stick a small piece of pretzel at the top for the stem, and use green icing to make vines.
- Mummy Oreo balls: Dip in white chocolate, then drizzle thin lines of extra white chocolate across the top like bandages. Add candy eyes to finish the look.
- Eyeball Oreo balls: Dip in white chocolate, stick on a candy eye in the center, then use red icing to draw squiggly lines for veins.
- Spider Oreo balls: Dip in dark or black chocolate, add candy eyes, and use pretzel sticks or licorice strings to create legs.
Don’t be afraid to get creative. Add sprinkles, edible glitter, or colored sugar to give your Oreo balls extra Halloween flair.
Step 7: Chill again
Once decorated, return the tray of Oreo balls to the fridge for at least 30 minutes. This allows the chocolate coating to fully harden and ensures your decorations stay intact. After chilling, they’re ready to serve. Arrange them on a festive Halloween platter or place them in cupcake liners for easy serving. These bite-sized treats will be the highlight of your party table, and guests will love choosing their favorite spooky design.
Why this recipe works so well for Halloween
- Quick and easy: No baking required, making it perfect for busy schedules.
- Customizable: You can decorate them in dozens of spooky designs.
- Kid-friendly: Safe for little helpers to participate.
- Crowd-pleaser: Everyone loves Oreos, and the truffle-like texture feels indulgent without being too heavy.
How to make Oreo balls ahead of time
Oreo balls can be stored in an airtight container in the fridge for up to two weeks, or in the freezer for up to two months. This makes them ideal for party prep, you can make them days in advance and decorate closer to Halloween.
Pro Tip: If freezing, let them thaw in the fridge overnight before serving to avoid condensation ruining your decorations.
Creative Halloween variations
If you want to mix things up, try these creative spins:
- Zombie brains: Dip in white chocolate tinted with green food coloring. Use red icing to add “veins.”
- Witches’ cauldrons: Dip in black chocolate and top with green icing “bubbles.”
- Monster mash: Use a mix of colors, like purple, green, orange and add candy eyes to create silly monster faces.
- Pumpkin spice Oreo balls: Swap cream cheese for pumpkin cream cheese spread to add autumn flavor.
Pairing Halloween Oreo balls with other party treats
These Oreo balls are great on their own, but even better as part of a Halloween dessert spread. Pair them with:
- Candy corn bark
- Caramel apples
- Halloween cupcakes with themed frosting
- Spooky popcorn mix
A dessert table with different textures and colors makes for an unforgettable party display.
Nutritional information
One Halloween Oreo ball (based on 36 servings) has approximately:
- 120 calories
- 7g fat
- 12g carbohydrates
- 1g protein
While they’re definitely an indulgence, they’re small enough that you can enjoy a couple without overdoing it.
FAQs
Yes! You can substitute with mascarpone, peanut butter, or even frosting. The texture will be slightly different but still delicious.
Use a fork or dipping tool to hold the ball, dip it fully, then tap the fork gently on the side of the bowl to remove excess chocolate before placing it back on parchment paper.
Absolutely. Pumpkin spice, mint, or peanut butter Oreos make great variations for different flavor profiles.
They last up to two weeks in the fridge and up to two months in the freezer, making them a perfect make-ahead Halloween dessert.
Yes, because they contain cream cheese. Always store them chilled until ready to serve.
Final thoughts
If you’re looking for a dessert that’s festive, fun, and easy to make, this Halloween Oreo Balls Recipe is your answer. With just a handful of ingredients, you can whip up a tray of spooky, bite-sized delights that will impress kids and adults alike.
Whether you decorate them as pumpkins, mummies, eyeballs, or monsters, Oreo balls are guaranteed to be the star of your Halloween dessert table. So grab a package of Oreos, some chocolate, and let your creativity run wild. After all, Halloween is the one time of year when food can be both spooky and sweet.

36
servings30
minutes1
minute120
kcalThese spooky Halloween Oreo balls are the ultimate no-bake treat for your Halloween party. Made with just Oreos, cream cheese, and chocolate, then decorated as pumpkins, mummies, eyeballs, or spiders, they’re festive, fun, and a guaranteed crowd-pleaser.
Ingredients
36 Oreo cookies (regular, not Double Stuf)
8 oz cream cheese (softened)
16 oz chocolate (white, milk, or dark depending on your designs)
Food coloring (orange, green, red, or black)
Pretzel sticks (for pumpkin stems or spider legs)
Candy eyes or icing pens (for eyeballs and mummies)
Sprinkles (Halloween-themed colors work best)
Directions
- Crush the Oreos
Place Oreos in a food processor and pulse until fine crumbs form. If you don’t have a processor, put them in a sealed bag and crush with a rolling pin. Set aside 2–3 tablespoons of crumbs for decorating later. - Mix with cream cheese
In a large bowl, combine the crumbs with softened cream cheese until fully blended and dough-like. The mixture should hold together when pressed. - Roll into balls
Line a baking sheet with parchment paper. Scoop out even portions of the dough and roll into 1-inch balls. Place on the tray. - Chill
Refrigerate for 1 hour or freeze for 20 minutes until firm. This helps the balls hold their shape when dipped. - Melt chocolate
In a microwave-safe bowl, melt chocolate in 30-second intervals, stirring until smooth. Add food coloring as needed for pumpkins, mummies, monsters, or spiders. - Dip and decorate
Using a fork or dipping tool, coat each ball in chocolate and return to the tray. While the coating is still wet, add decorations. Make pumpkins with orange chocolate and pretzel stems, mummies with white drizzle and candy eyes, eyeballs with red icing veins, and spiders with dark chocolate and pretzel stick legs. - Chill again
Refrigerate for 30 minutes or until the chocolate sets. Serve on a Halloween platter and enjoy these spooky, bite-sized treats.