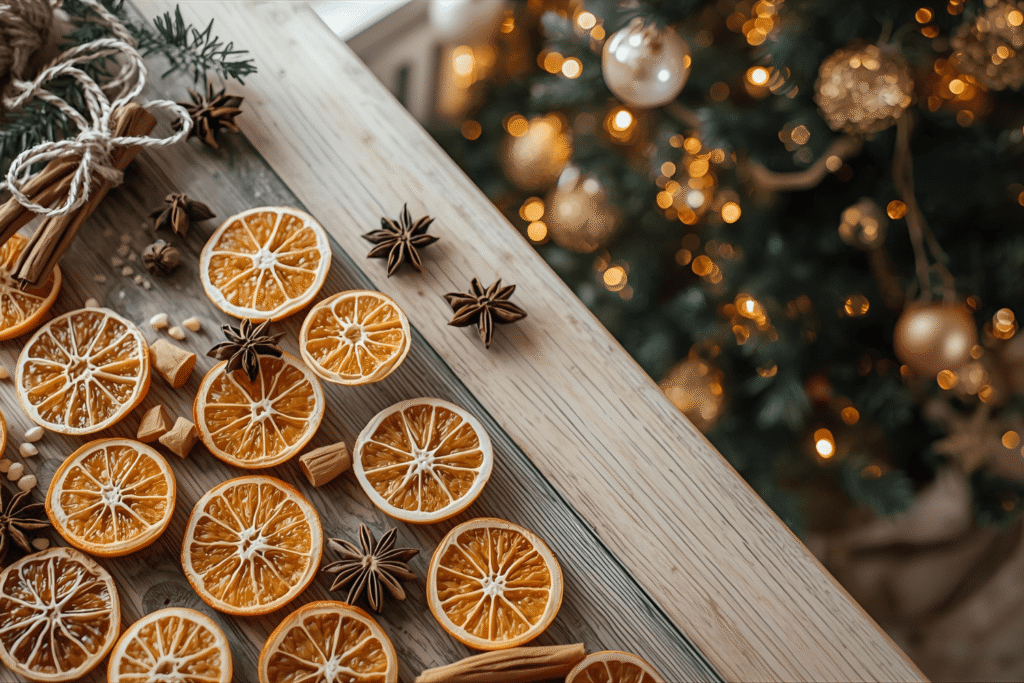
If you want a Christmas decorating project that feels cozy, natural, and instantly festive, dried orange slices are about to become your new obsession. The citrusy glow, the warm amber tones, and that subtle winter scent give your home the kind of handmade charm that feels both nostalgic and Pinterest ready.
Searches for natural Christmas decorations grew by nearly 300 percent on Pinterest last year, and dried orange slices were one of the top trending DIY crafts for the holidays. They’re easy, inexpensive, and look stunning no matter your decor style.
In this guide, you’ll learn exactly how to make dried orange slices Christmas decorations, how to stop them from molding, and all the creative ways to style them around your home.
Why dried orange slice decorations are perfect for Christmas
There’s a reason these rustic citrus decorations keep popping up everywhere from Instagram to high end interior blogs.
First, dried oranges are beautiful. When the light hits them, they glow like tiny stained glass ornaments. They look hand crafted but still elegant enough for any Christmas theme.
Second, they’re one of the easiest eco friendly decorations you can make. According to a report from WRAP, households create 30 percent more waste during Christmas in the UK alone. Using natural decor is a simple way to cut down on plastics and disposable items.
Third, this DIY is budget friendly. One bag of oranges (usually £1 to £2) can decorate a tree, gift wrapping, a garland, and a table centerpiece.
There’s no need for fancy tools. You only need patience and a warm oven.
What you need to make dried orange slice Christmas decorations
Ingredients and supplies
You only need a few basics.
- Oranges (navel oranges work best)
- A sharp knife
- A cutting board
- Baking trays
- Baking paper
- Paper towels
- Cooling rack
Optional add ons
If you want a more decorative look, try adding:
- Cinnamon sticks
- Star anise
- Twine or jute string
- Ribbon
- Dried greenery like eucalyptus
- Whole cloves
These natural extras create a stronger festive scent and elevate the overall look.
Choosing the right oranges
The best oranges are:
- Firm, not soft
- Bright in color
- Medium sized
- Seedless if possible
Pro Tip: Blood oranges and grapefruits create beautifully colored slices if you want a more dramatic palette.
How to dry orange slices for Christmas decorations
Drying oranges is simple, but getting them perfectly translucent takes a little technique.
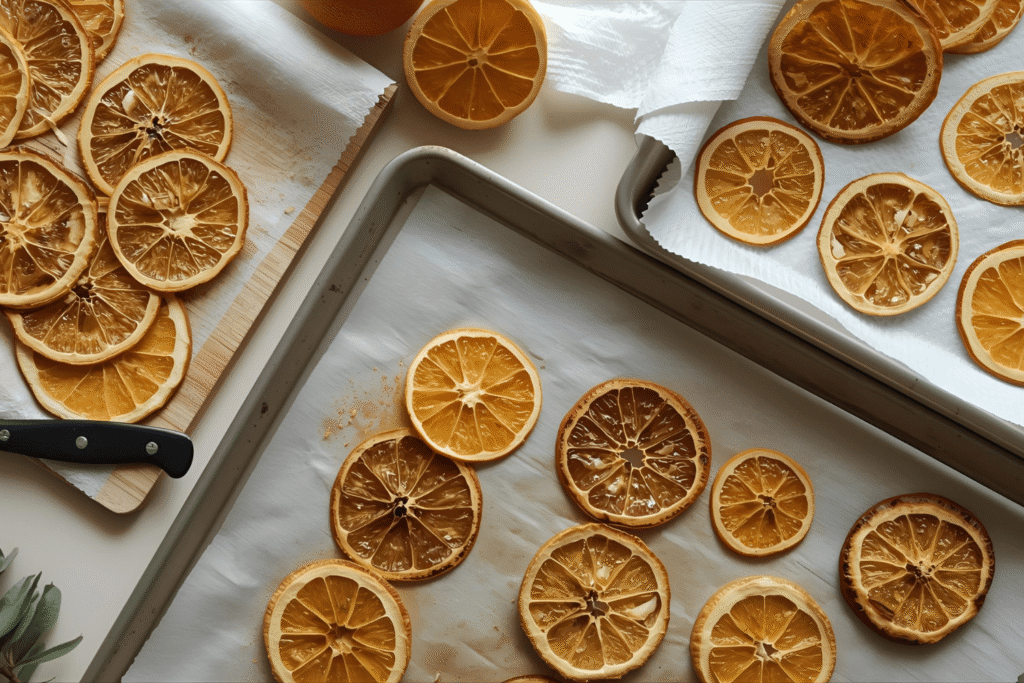
Step by step guide
- Preheat your oven to 90 to 100°C (around 200°F).
- Slice your oranges into 5 mm thick slices. Thinner slices dry faster but burn easily.
- Dab both sides with a paper towel to remove excess moisture.
- Line a baking tray with baking paper.
- Arrange slices so they do not overlap.
- Bake for 2 and a half to 3 hours, flipping every 30 minutes.
The key is slow, even drying.
Oven method
Most people use the oven because it’s fast and reliable.
Bake at low heat and keep checking for dark spots. If your oven runs hot, crack the door slightly to release moisture and prevent browning.
Air drying method
Air drying is the most natural method, but it takes 2 to 4 days depending on humidity.
Place slices on a cooling rack near a sunny window and rotate daily. This method creates the most fragrant results and is ideal if you want a fully zero waste craft.
Dehydrator method
If you love dehydrating fruit, this is the easiest hands off option. Set your dehydrator to 52 to 55°C and leave the slices for 6 to 8 hours.
How to know when your slices are fully dried
Your oranges are ready when:
- They feel firm
- They are no longer sticky
- They’re evenly translucent
- No moisture appears when squeezed
If you under dry them, mold forms quickly, especially once hung on a warm Christmas tree.
How to prevent mold and keep your dried orange slices fresh
Mold is the most common issue with dried citrus decorations.
To keep your slices fresh:
- Dry them fully with no soft spots
- Avoid thick slices
- Store in an airtight container
- Add silica packets if storing long term
- Keep away from bathrooms or humid rooms
Fully dried slices last up to 2 years if stored properly.
If you notice any cloudiness, dark patches, or tackiness, they need more drying time.
Creative ways to use dried orange slices for Christmas
Once your slices are ready, the fun part begins. There are so many ways to style them throughout your home.
Dried orange slice garland
This is a classic Scandinavian inspired decoration.
You’ll need:
- Dried orange slices
- Twine or jute
- A needle or small skewer
Thread the slices evenly and hang across mantels, staircases, or windows. Add cinnamon sticks or eucalyptus for texture.
Dried orange slice ornaments
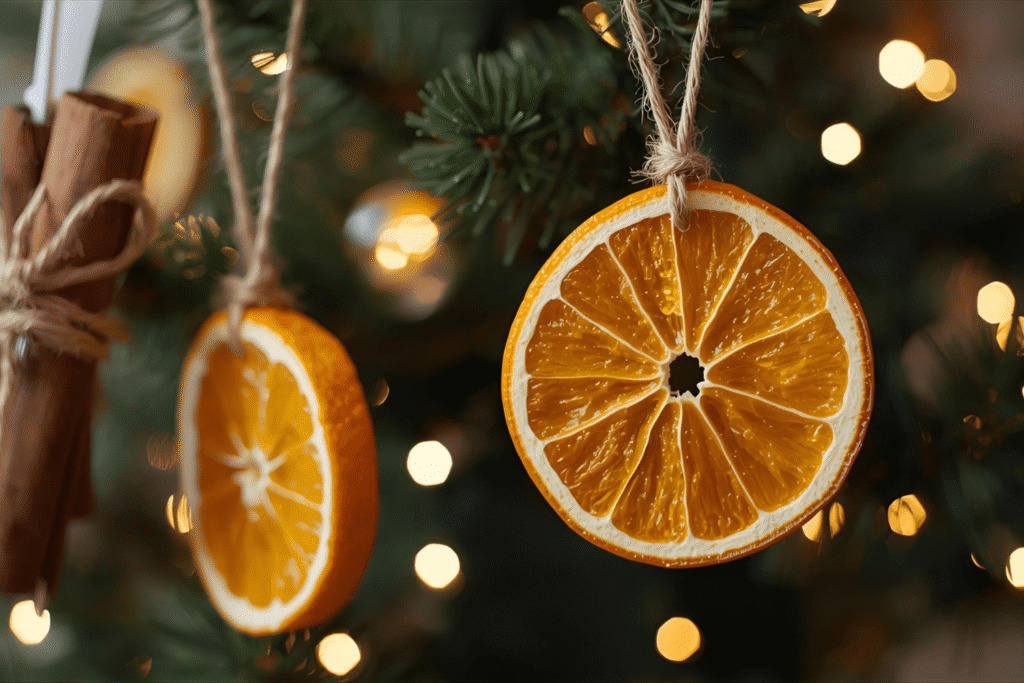
Simply poke a small hole near the edge of each slice, loop ribbon through, and hang on your Christmas tree.
They add a warm glow between fairy lights and create a natural luxe look.
Dried orange and cinnamon bundles
Bundle a slice with a cinnamon stick and tie with jute string.
These are perfect for:
- Napkin rings
- Mini gifts
- Stocking fillers
- Drawer refreshers
Gift wrapping accents
Wrapping gifts with kraft paper and adding a dried orange slice instantly turns simple packaging into designer looking Christmas wrapping.
Pair with:
- Black ribbon
- Natural string
- Dried lavender
- Eucalyptus sprigs
Table decor and place settings
Place an orange slice on each plate with a handwritten name tag for a rustic tablescape.
The 2024 Pinterest Predicts report shows a 45 percent rise in searches for natural tablescapes during Christmas, making this trend a perfect addition to your hosting setup.
Decorating ideas and style inspirations
Decor style influences how you should pair your dried oranges.
Scandinavian
Clean, minimal, and full of natural textures.
Use:
- Twine
- Wood beads
- Eucalyptus
- Neutral colors
Boho
For a warm, earthy style, add:
- Pampas grass
- Dried flowers
- Macrame cord
Traditional Christmas
Pair with:
- Red ribbon
- Holly
- Evergreen branches
Minimalist
Use oranges on their own with simple jute string.
Common mistakes to avoid
Even though this DIY is beginner friendly, a few pitfalls can ruin your slices.
- Slicing too thick makes them mold.
- Using high heat makes them brown quickly.
- Not flipping often enough causes sticky centers.
- Overlapping slices leads to uneven drying.
- Storing them before they cool completely traps moisture.
Pro Tip: If your slices start browning too early, reduce heat to 80°C and increase the door gap. Slow drying is always safer.
FAQs
They are either sliced too thin or your oven is too hot. Lower the heat and flip more often to prevent dark spots.
Yes. Air drying and dehydrators work perfectly. Air drying just takes longer.
When stored in airtight containers, they last up to two years. If left in humid environments, they may only last one season.
Fully dried slices rarely attract insects. Soft or under dried slices can attract them, so make sure they are crisp and moisture free.
Curling happens when the oven heats too fast. Use a lower temperature and pat slices dry before baking.
Yes, but only after the slices are completely dry. Add a tiny drop of orange, clove, or cinnamon oil to the back of each slice if you want a stronger scent. Keep the amount small so it doesn’t stain ribbon or wood surfaces.
Final thoughts
Making dried orange slices Christmas decorations is one of those easy, low effort projects that instantly makes your home feel warm and festive. It’s inexpensive, beginner friendly, and gives you decorations that look handmade in the best way. Even a single batch of oranges can transform your tree, your gift wrapping, and your table setting.
What people love most is how relaxing the process is. It’s slow, simple, and gives you a break from the usual holiday rush. Once you’ve done it once, you’ll see how easy it is to customize each slice with ribbon, spices, or greenery to match your style. It’s also a great craft to do with friends, kids, or while watching Christmas films.
If this is your first time trying it, start with one tray and experiment with slice thickness and drying time. You’ll quickly find what works for you. And who knows, this might become one of those small traditions you look forward to every December.
If you want to take this project a little further, try experimenting with different types of citrus. Lemons add a soft pastel yellow, limes bring a fresh pop of green, and blood oranges create the most beautiful deep red tones. Mixing all three gives your decorations more depth and makes your garlands look fuller. You can also combine your dried slices with dried apple rings or cinnamon sticks for an even more textured look. Small upgrades like these make your decorations feel thoughtful, personal, and completely unique to your home.