If you’re craving something creamy, dreamy, and perfectly portioned, this cheesecake cupcakes recipe is about to become your new favorite dessert. These little bites of heaven combine the rich flavor of traditional cheesecake with the convenience of cupcakes, ideal for parties, birthdays, or just a cozy night in. Plus, they’re way easier to make than a full cheesecake (and no one has to share!).
According to Google Trends, mini cheesecakes have seen a steady 35% increase in searches over the past two years, proving that small, portion-friendly desserts are totally in right now. Ready to make your own? Let’s get baking.
Why you’ll love this cheesecake cupcakes recipe
Here’s why you’ll fall in love with this recipe:
- Perfect portions – no cutting or messy slicing required
- Faster bake time – ready in under 30 minutes
- Customizable flavors – from strawberry swirl to salted caramel drizzle
- Make-ahead friendly – they keep well in the fridge or freezer
Pro Tip: These cupcakes make a great dessert for brunches, picnics, or baby showers. Serve them with fresh fruit or a drizzle of chocolate sauce for extra flair.
Ingredients you’ll need
Here’s everything you’ll need for the base recipe. It’s simple, quick, and uses pantry staples.
For the crust:

- 1 cup graham cracker crumbs (or digestive biscuits)
- 3 tbsp melted butter
- 1 tbsp granulated sugar
For the cheesecake filling:

- 16 oz (450 g) cream cheese, softened
- ½ cup granulated sugar
- 2 large eggs
- 1 tsp vanilla extract
- ½ cup sour cream or Greek yogurt
- 1 tbsp all-purpose flour
Optional toppings:
- Fresh berries
- Lemon curd
- Chocolate ganache
- Caramel sauce
If you want to go dairy-free or lighter, don’t worry, we’ll cover substitutions later.
Step-by-step guide to making cheesecake cupcakes
This recipe makes about 12 cheesecake cupcakes, and the best part is that it’s both simple and beginner-friendly. From prep to plate, you’ll be done in less than an hour, and your kitchen will smell like a bakery by the time you’re finished.
Think of it as three mini stages: making the crust, preparing the luscious cheesecake filling, and baking (plus chilling, which is where the magic happens).
Preparing the crust
This buttery base gives each cupcake that satisfying crunch that contrasts perfectly with the creamy top.
- Line your muffin tin: Place 12 cupcake liners in a standard muffin tin. Paper liners work perfectly, but you can also use reusable silicone ones if you prefer easy cleanup.
- Mix your crust: In a small bowl, stir together the graham cracker crumbs, sugar, and melted butter. Mix until the texture resembles wet sand. If it’s too dry, add a tiny splash more butter, you should be able to press it together easily.
- Fill the liners: Spoon about one tablespoon of the crumb mixture into each liner. Use your fingers or the back of a spoon to press it firmly into the bottom so it’s tightly packed. This ensures a solid, non-crumbly base.
- Pre-bake for the perfect crunch: Bake the crusts at 325°F (163°C) for about 5 minutes. This step helps set the crust so it doesn’t turn soggy later. Remove from the oven and let them cool slightly while you move on to the filling.
Pro Tip: For that professional, even look, use a shot glass or a small measuring cup to gently press down the crusts before baking. It helps the base stay uniform and compact.
Making the creamy cheesecake filling
Here’s where the magic happens. The key to that irresistibly smooth, velvety texture is patience and gentle mixing, think creamy, not airy.
- Beat your base ingredients: In a large mixing bowl, beat the softened cream cheese and sugar on medium speed until completely smooth and fluffy (about 2 minutes). Scrape down the sides of the bowl to make sure everything blends evenly.
- Add the eggs carefully: Crack in the eggs one at a time, beating on low speed after each addition just until combined. Overbeating introduces air, which can lead to cracks as the cheesecakes bake.
- Add the flavor and texture: Mix in the vanilla extract, sour cream (or Greek yogurt), and flour. The sour cream adds tanginess and creaminess, while the flour gives the cupcakes a little structure so they don’t sink in the middle. The mixture should look silky and slightly thick but pourable.
- Fill the cups evenly: Spoon or scoop the filling into each liner, leaving about ¼ inch from the top. Each one will hold around 3 tablespoons of filling. You can use a cookie scoop for even portions.
Pro Tip: Gently tap the muffin pan on the counter a few times before baking. This helps release trapped air bubbles and gives you a smoother top surface.
Baking and cooling
Baking cheesecake is all about precision and patience. These mini cheesecakes cook faster than a full-sized one, but they still need gentle heat and a calm cool-down.
- Bake at 325°F (163°C) for 18–20 minutes, or until the centers are mostly set but still have a slight jiggle when you gently shake the pan. They’ll continue to cook slightly after being removed from the oven.
- Cool gradually: Turn off the oven, open the door slightly, and let them cool inside for about 10 minutes. This slow transition helps prevent the tops from cracking.
- Room temperature cooling: Transfer the pan to a wire rack and let the cupcakes cool completely. Don’t rush this step, warm cheesecake filling is fragile and can sink if moved too early.
- Chill to perfection: Once they’ve cooled, cover and refrigerate for at least 2 hours (overnight is even better). Chilling allows the texture to set into that classic rich, creamy consistency we all love.
Pro Tip: Never skip the chilling process! Cheesecake flavor actually deepens as it sits. If you’re short on time, you can chill them in the freezer for 30–40 minutes to speed things up, but the fridge method gives a smoother texture.
Once chilled, your cheesecakes are ready to top, serve, and enjoy. Whether you’re adding berries, chocolate, or caramel, that first bite will be pure bliss.
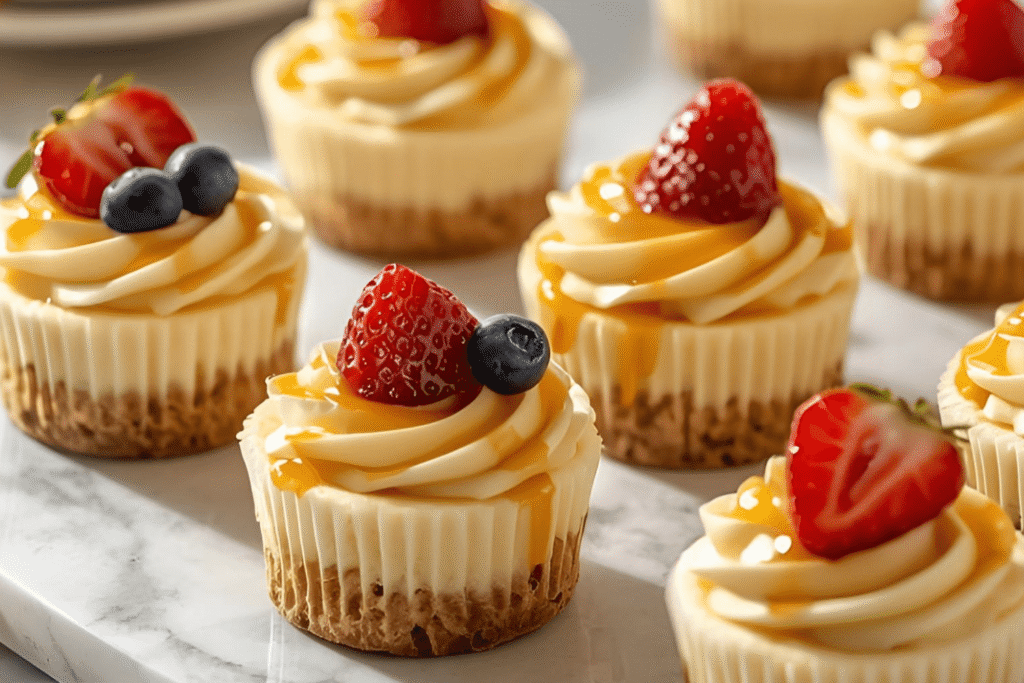
Adding your favorite toppings
Now the fun part, decorating!
Try any of these ideas:
- Berry lovers: top with a spoonful of strawberry or raspberry jam
- Chocolate fans: drizzle melted chocolate or Nutella
- Citrus vibe: swirl lemon curd before baking for a zesty touch
- Fall twist: top with caramel sauce and crushed pecans
You can easily turn this base cheesecake cupcakes recipe into red velvet, oreo, or pumpkin spice versions by mixing in flavorings or cookie crumbs.
Pro tips for perfect cheesecake cupcakes every time
- Use room-temperature ingredients. This prevents lumps and helps everything blend smoothly.
- Don’t overbake. Cheesecake keeps cooking as it cools. Remove it when it’s slightly wobbly in the center.
- Cool gradually. Sudden temperature changes cause cracks.
- Use a water bath (optional). Placing your muffin pan inside a larger pan with hot water helps prevent cracking.
- Use full-fat cream cheese. For best results, skip low-fat varieties, the texture just isn’t the same.
Pro Tip: If cracks appear, no worries! Add toppings like fruit or ganache to hide them beautifully.
Creative flavor variations to try
Want to keep things interesting? Try these twists on the classic cheesecake cupcakes recipe.
1. Oreo cheesecake cupcakes
Mix crushed Oreo cookies into the batter and use a whole Oreo as the crust base.
2. Lemon blueberry cupcakes
Add lemon zest to the filling and swirl in blueberry jam before baking.
3. Salted caramel cheesecake cupcakes
After baking, top with caramel sauce and a sprinkle of sea salt flakes.
4. Pumpkin spice cupcakes
Add pumpkin puree and cinnamon to the filling for a cozy autumn version.
5. Nutella swirl cupcakes
Drop a teaspoon of Nutella on top before baking and swirl with a toothpick.
Pro Tip: Freeze different flavors in separate batches so you always have options for guests (or for midnight cravings!).
How to store cheesecake cupcakes
Proper storage keeps them fresh and creamy for days.
- In the fridge: Store in an airtight container for up to 5 days.
- In the freezer: Wrap each cupcake individually in plastic wrap and freeze for up to 2 months.
When ready to eat, thaw them in the fridge overnight and add fresh toppings before serving. If you plan to bring them to an event, keep them chilled until ready to serve, they taste best cold.
How to make them healthier (without losing the taste)
You can easily make these cheesecake cupcakes lighter without sacrificing flavor.
- Swap sour cream for Greek yogurt. Adds protein and cuts fat.
- Use a reduced-fat cream cheese. But avoid fat-free, it alters texture.
- Replace sugar with honey or a natural sweetener like Stevia.
- Try almond flour crusts instead of graham crackers for a gluten-free version.
According to Harvard Health Publishing, Greek yogurt contains nearly double the protein of regular yogurt, making it an excellent substitute in desserts.
Pro Tip: Serve your healthier cheesecake cupcakes with a drizzle of fruit puree instead of syrup to keep them light and fresh.
Common mistakes and how to avoid them
Even seasoned bakers can make mistakes with cheesecake, so here’s how to sidestep the most common ones:
- Cracked tops: Caused by overbaking or overmixing. Stop mixing once the batter looks smooth.
- Soggy crusts: Make sure your crusts are baked first and fully cooled before adding filling.
- Dense texture: Don’t skip room-temperature ingredients. Cold cream cheese clumps easily.
- Sunken centers: Avoid opening the oven too early, it causes temperature drops.
Pro Tip: If you notice a small crack or sinkhole, top with whipped cream and berries. Instant fix!
FAQs
Yes! Replace each egg with ¼ cup of applesauce or 3 tablespoons of yogurt. The texture will be slightly softer but still delicious.
It’s optional for cupcakes. Since they’re small, they bake evenly without one, but it can help prevent cracks.
Absolutely. Strawberry or chocolate cream cheese adds a fun twist, but skip ones with savory flavors.
Yes! They taste even better after chilling overnight. Perfect for parties or meal prepping desserts.
Fresh fruit, jam, whipped cream, or melted chocolate are all classics. Mix and match based on the season.
Final thoughts
This cheesecake cupcakes recipe proves that desserts don’t have to be complicated to feel special. They’re simple, elegant, and endlessly customizable, making them perfect for any occasion, from date nights to Sunday brunches. Once you’ve made them once, you’ll find yourself coming back to this recipe again and again.
So go ahead, grab your muffin tin, and bake up a batch of these creamy cheesecake cupcakes. Your sweet tooth will thank you later.

12
servings20
minutes20
minutes280
kcalCreamy, bite-sized cheesecakes with buttery graham cracker crusts and customizable toppings like berries, caramel, or chocolate. Perfect for parties or cozy nights in.
Ingredients
- For the crust:
1 cup graham cracker crumbs (or digestive biscuits)
3 tbsp melted butter
1 tbsp granulated sugar
- For the cheesecake filling:
16 oz (450 g) cream cheese, softened
½ cup granulated sugar
2 large eggs
1 tsp vanilla extract
½ cup sour cream or Greek yogurt
1 tbsp all-purpose flour
- Optional toppings:
Fresh strawberries, blueberries, or raspberries
Caramel sauce or chocolate ganache
Lemon curd or whipped cream
Directions
- Prepare the crust: Preheat oven to 325°F (163°C). Line a 12-cup muffin tin with cupcake liners. In a bowl, mix graham cracker crumbs, sugar, and melted butter until combined. Press 1 tablespoon of the mixture into each liner and bake for 5 minutes. Let cool slightly.
- Make the cheesecake filling: Beat cream cheese and sugar until smooth (about 2 minutes). Add eggs one at a time, mixing just until combined. Stir in vanilla extract, sour cream, and flour until creamy.
- Assemble: Spoon about 3 tablespoons of filling over each crust. Gently tap the pan to release air bubbles.
- Bake: Bake for 18–20 minutes, or until centers are set but slightly jiggly. Turn off the oven and let them cool with the door slightly open for 10 minutes.
- Cool and chill: Remove and let cool completely, then refrigerate for at least 2 hours (overnight for best results).
- Top and serve: Add your favorite toppings like caramel drizzle, fruit, or whipped cream before serving.