Halloween is the ultimate excuse to get creative in the kitchen. Costumes, parties, and of course, treats take center stage every October. And what better way to impress your friends or family than with a homemade Halloween cupcake recipe that’s spooky, sweet, and fun to make?
Cupcakes are the perfect Halloween dessert because they’re easy to customize, portion-sized, and can double as edible décor. In fact, according to a recent survey, over 70% of people say themed desserts are the highlight of holiday parties, proving that your cupcakes could steal the show.
Why you’ll love this Halloween cupcake recipe
- Easy to make – no professional baking skills required.
- Customizable – decorate with spiders, ghosts, pumpkins, or any spooky theme you like.
- Kid-friendly – little hands can help with frosting and toppings.
- Perfect for parties – portable, shareable, and photo-worthy.
Pro Tip: Always bake a few extra cupcakes. They disappear faster than you think once they hit the party table.
Ingredients for Halloween cupcakes
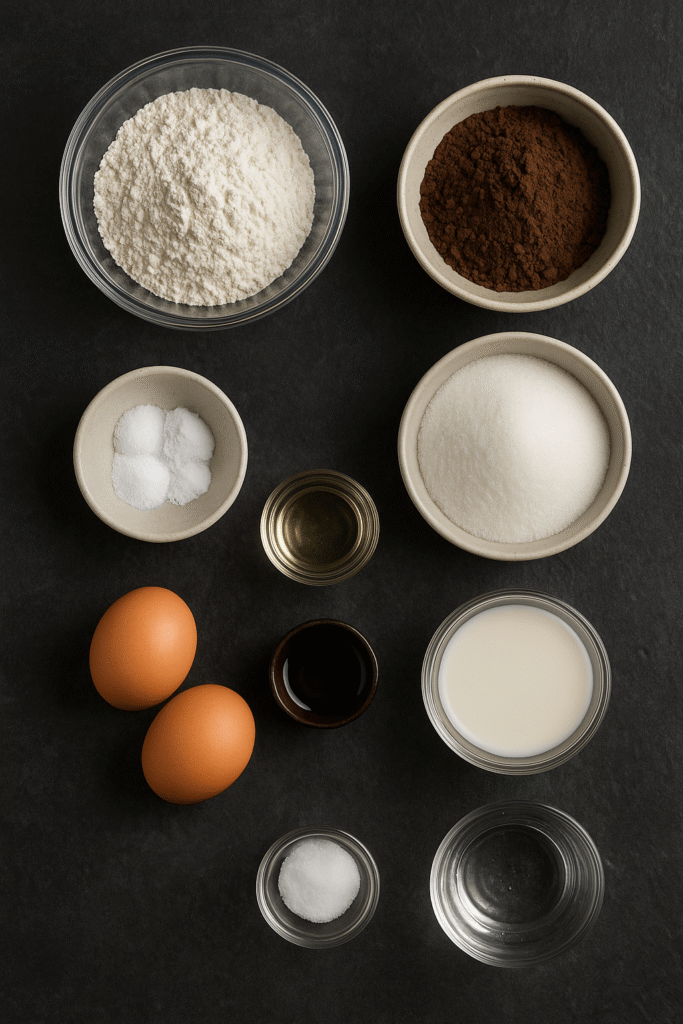
This recipe makes about 12 cupcakes.
- 1 ¼ cups all-purpose flour
- ½ cup unsweetened cocoa powder
- 1 cup granulated sugar
- 1 tsp baking powder
- ½ tsp baking soda
- ½ tsp salt
- ½ cup vegetable oil
- 2 large eggs
- 1 tsp vanilla extract
- ½ cup buttermilk (or substitute with milk + 1 tsp lemon juice)
- ½ cup hot water
For the frosting
- 1 cup unsalted butter (softened)
- 3 cups powdered sugar
- 2 tbsp milk
- 1 tsp vanilla extract
- Food coloring (orange, black, green, or purple)
Decorations
- Candy eyes
- Halloween sprinkles
- Gummy worms or gummy spiders
- Mini pumpkin candies
Step by step: how to make this Halloween cupcake recipe
Baking Halloween cupcakes is a mix of science and creativity. Follow these steps carefully and you’ll end up with cupcakes that are moist, fluffy, and decorated to perfection.
Step 1: Prepare your batter
Start by preheating your oven to 350°F (175°C). This ensures your oven is fully heated by the time your batter is ready, one of the secrets to evenly baked cupcakes. Line a 12-cup muffin tin with themed cupcake liners. Go for fun Halloween designs like pumpkins, bats, or spiderwebs to make every detail feel festive.
In a large bowl, whisk together the dry ingredients: flour, cocoa powder, sugar, baking powder, baking soda, and salt. Whisking isn’t just mixing, it also aerates the flour, which helps create that light, fluffy cupcake texture.
In another bowl, combine the wet ingredients: oil, eggs, vanilla extract, and buttermilk. Mix until smooth. The oil helps keep the cupcakes moist, while the buttermilk adds a slight tang that balances out the richness of the chocolate.
Now, slowly combine the wet and dry mixtures. Stir gently with a spatula or wooden spoon until just incorporated. Don’t worry if the batter looks a little lumpy, that’s actually a good sign you haven’t overmixed. Finally, pour in the hot water and stir until you have a glossy, pourable batter. The hot water blooms the cocoa powder, intensifying its flavor and giving you that deep chocolate taste that’s perfect for a Halloween indulgence.
Pro Tip: Don’t overmix. Overworking the batter develops gluten, which can make your cupcakes tough and dense instead of soft and fluffy. A few streaks of flour left in the mix are better than overmixing.
Step 2: Bake the cupcakes
Divide the batter evenly among the liners. The easiest way to do this is with a large ice cream scoop or measuring cup, it keeps your portions consistent, so every cupcake bakes evenly. Fill each liner about two-thirds full to give the cupcakes room to rise without overflowing.
Bake in the preheated oven for 18–20 minutes. Every oven is slightly different, so start checking at the 18-minute mark. Insert a toothpick into the center of a cupcake, if it comes out clean or with just a few moist crumbs, they’re done.
Remove from the oven and let them cool in the tin for 5 minutes before transferring to a wire rack. Cooling on a rack prevents condensation from building up at the bottom, which can make cupcakes soggy. Allow them to cool completely before frosting, otherwise the heat will melt your beautiful decorations.
Pro Tip: If you’re baking multiple batches, wipe down the muffin tin between rounds. Leftover crumbs can burn and affect the next set of cupcakes.
Step 3: Make the frosting
While your cupcakes cool, it’s time to whip up the frosting. Start with softened butter, it should be soft enough to press a finger into but not melted. Beat the butter with a hand or stand mixer on medium-high speed until pale and fluffy. This step is key for creating a light, creamy base.
Gradually add the powdered sugar, about half a cup at a time, while mixing on low speed to avoid sugar clouds. Once incorporated, add the vanilla extract and milk. Increase the speed to high and beat until smooth and fluffy. If the frosting is too stiff, add a teaspoon of milk at a time. If it’s too soft, add a little more powdered sugar.
Now comes the fun part: color! Divide the frosting into separate bowls and add food coloring. Orange and black are classic Halloween shades, but don’t stop there, green, purple, and even blood-red can create amazing effects. Gel food coloring works best because it gives intense colors without watering down the frosting.
Pro Tip: For deep black frosting, start with chocolate buttercream (add cocoa powder) before coloring. It’s much easier to get true black from a brown base than from white.
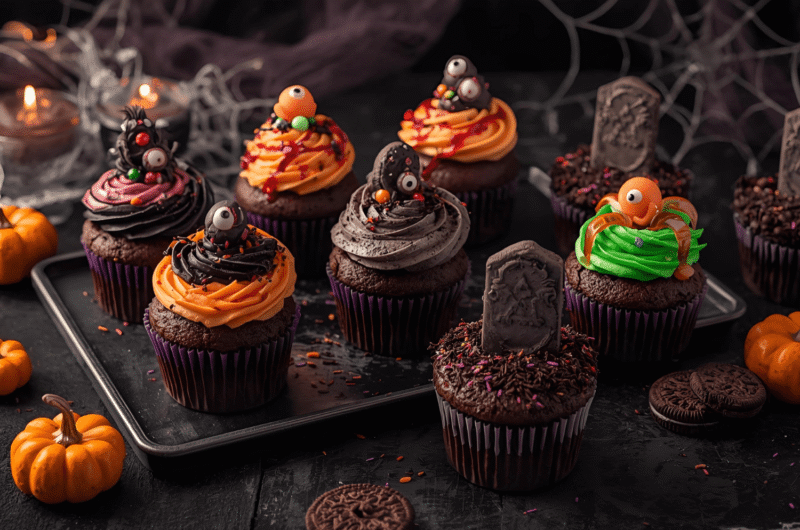
Step 4: Frost and decorate
Once your cupcakes are completely cool, it’s time to bring them to life. Transfer your frosting into piping bags fitted with your favorite tips. A large star tip gives bakery-style swirls, while a round tip is great for monster faces or eyeballs.
Pipe swirls of frosting on each cupcake, starting from the outside edge and working inward in a spiral. If you don’t have piping bags, don’t stress, you can simply spread frosting with a spatula for a rustic, homemade look that’s just as charming.
Now the magic happens with decorations:
- Place candy eyeballs on the frosting for an instant monster effect.
- Press gummy worms so they look like they’re crawling out of the cupcake.
- Add Halloween-themed sprinkles for instant festive flair.
- Use a small knife to drizzle red gel icing for a “bloody” effect.
- Crush Oreo cookies on top for a “graveyard dirt” look and stick in a cookie piece as a tombstone.
This is where you can let your creativity run wild. No two cupcakes need to look alike, and half the fun is seeing what spooky designs you can dream up.
Pro Tip: Want bakery-level presentation? Hold your piping bag straight up, apply even pressure, and lift slowly as you swirl. This creates a tall, elegant frosting peak that’s perfect for showing off your Halloween garnishes.
Creative Halloween cupcake decorating ideas
Want your cupcakes to stand out even more? Try these spooky themes:
- Spiderweb cupcakes – Pipe white frosting in circles, then drag a toothpick outward to create a web.
- Pumpkin patch cupcakes – Use orange frosting with green vines and top with candy pumpkins.
- Mummy cupcakes – Pipe white frosting lines like bandages and add two candy eyes peeking out.
- Witch’s cauldron cupcakes – Top with green frosting and sprinkle “bubbling” candy pieces.
These designs are fun for kids’ parties, school events, or even adult gatherings with a playful twist.
Tips for the perfect Halloween cupcakes
- Room temperature ingredients – Ensure butter, eggs, and milk aren’t cold for smoother mixing.
- Use quality cocoa – It makes a huge difference in flavor.
- Chill frosting – If your frosting feels too soft, chill it for 10 minutes before piping.
- Store properly – Keep cupcakes in an airtight container for up to 3 days.
Pro Tip: If you’re short on time, use a boxed cake mix as a base and focus your energy on frosting and decorations. Most people won’t notice the difference.
Why Halloween cupcakes are party must-haves
Cupcakes aren’t just dessert, they’re conversation starters. A themed batch on your table instantly signals festive vibes. Plus, cupcakes are portion controlled (sort of) and easier to grab than slicing a cake.
In 2022, Halloween spending in the U.S. hit over $10 billion, with themed food and party supplies being a huge chunk of that (National Retail Federation). That means guests expect holiday-themed treats, and cupcakes deliver the wow factor without stressing you out in the kitchen.
Pairing Halloween cupcakes with drinks
Balance your sweet treats with fun non alcoholic Halloween drinks. Pair your cupcakes with:
- A fizzy Halloween mocktail (like orange and cranberry juice with grenadine)
- Pumpkin spice lattes for cozy fall vibes
- Hot apple cider for a warming touch
This makes your dessert table feel complete and keeps the theme cohesive.
Fun Halloween party ideas to go with cupcakes
Your cupcakes will shine even more when paired with themed activities:
- Cupcake decorating station – Set out frosting bags and toppings for a DIY station.
- Pumpkin carving contest – Sweet treats as prizes make it extra fun.
- Costume photo booth – Guests can hold cupcakes as props for hilarious photos.
FAQs
Yes! Bake up to 2 days ahead and store unfrosted cupcakes in an airtight container. Frost them on the day of the party for freshness.
Absolutely. Freeze unfrosted cupcakes for up to 2 months. Thaw at room temperature before decorating.
Buttercream is classic, but cream cheese frosting also pairs well with chocolate cupcakes. Just keep it refrigerated.
Not really. A piping bag helps with designs, but a spoon and knife work for rustic frosting.
Yes. Substitute with a gluten-free all-purpose flour blend and double-check that decorations are gluten free.
Final thoughts
This Halloween cupcake recipe is the ultimate way to celebrate spooky season with style. From rich chocolate bases to colorful frosting and creative decorations, these cupcakes are guaranteed to impress.
Whether you’re throwing a kids’ party, attending a potluck, or just baking for fun, they’re festive, delicious, and surprisingly simple. So grab your mixing bowl, whip up a batch, and watch your guests light up when they see your spooktacular creations.
Halloween only comes once a year, and these cupcakes make it unforgettable.
4
servings15
minutes20
minutes300
kcalThese spooky Halloween cupcakes are rich, chocolatey, and decorated with festive frosting and candy toppings. Perfect for parties, trick-or-treat gatherings, or a fun family baking night.
Ingredients
- For the cupcakes
½ cup all-purpose flour
2 tbsp unsweetened cocoa powder
¼ cup + 2 tbsp granulated sugar
¼ tsp baking powder
⅛ tsp baking soda
Pinch of salt
2 tbsp vegetable oil
1 large egg
¼ tsp vanilla extract
2 tbsp buttermilk (or milk + a drop of lemon juice)
2 tbsp hot water
- For the frosting
¼ cup unsalted butter (softened)
¾ cup powdered sugar
½ tbsp milk
¼ tsp vanilla extract
Food coloring (orange, black, green, or purple)
- Decorations
Candy eyeballs
Halloween sprinkles
Gummy worms or spiders
Mini pumpkin candies
Directions
- Prepare the batter
Preheat the oven to 350°F (175°C). Line a muffin tin with 4 Halloween-themed cupcake liners. In a bowl, whisk flour, cocoa powder, sugar, baking powder, baking soda, and salt. In another bowl, whisk together the oil, egg, vanilla, and buttermilk. Slowly combine wet and dry ingredients. Add hot water last and stir until smooth and glossy. - Bake the cupcakes
Scoop the batter evenly into the liners, filling each about two-thirds full. Bake for 18–20 minutes, or until a toothpick inserted in the center comes out clean. Let cool in the pan for 5 minutes, then transfer to a wire rack to cool completely. - Make the frosting
Beat the butter with a mixer until light and fluffy. Gradually add powdered sugar, then milk and vanilla. Divide into bowls and tint each with food coloring of choice. Mix until colors are vibrant. - Decorate
Pipe swirls of frosting onto each cooled cupcake. Top with candy eyeballs, gummy worms, sprinkles, or mini pumpkin candies. For extra spooky vibes, drizzle with red gel icing for a “bloody” effect.