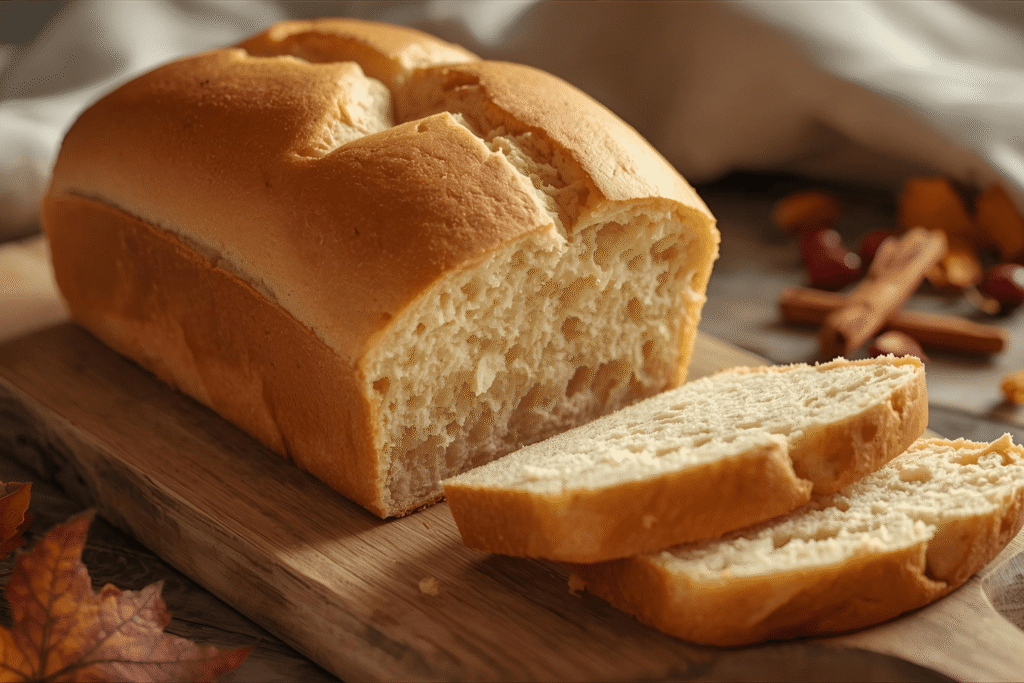
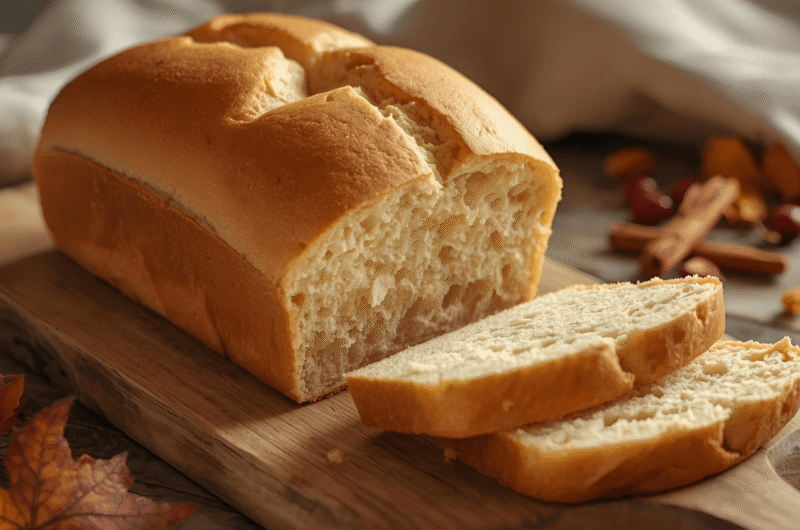
If you are looking for a cozy, heart warming recipe that instantly makes your house smell like fall, this thanksgiving bread is it. It’s the kind of bread your guests tear into before the turkey even hits the table. Soft, buttery, lightly sweet, and unbelievably fluffy, it’s the holiday recipe everyone secretly hopes you bring every year.
Thanksgiving recipes create a moment, and this one is all about that soft glow of comfort. Imagine warm slices, curls of butter melting on top, and that slightly sweet aroma filling the whole kitchen. Pure holiday magic.
Why thanksgiving bread belongs on every holiday table
Bread might feel simple, but during a busy holiday dinner it becomes pure comfort fuel. According to recent surveys, 68 percent of people say they judge a Thanksgiving meal by the bread selection alone. Your main dishes matter, but a soft, perfectly baked loaf sets the tone for the entire feast.
This recipe is also:
- Budget friendly
- Beginner friendly
- A perfect make ahead option
- Freezer friendly
- Ideal for leftovers
And there is something so grounding about homemade bread. It slows down the chaos and gives you a moment to breathe, knead, and enjoy the holiday prep.
Ingredients you will need
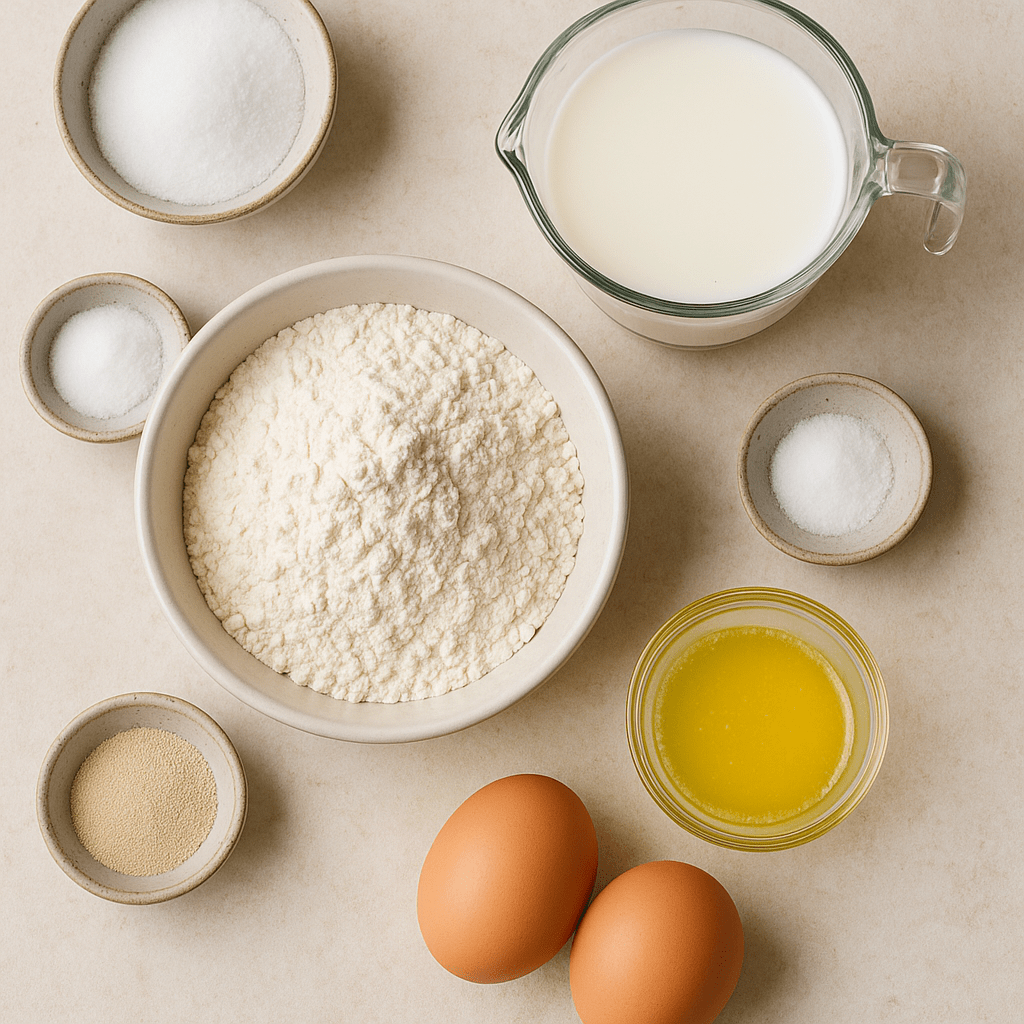
This thanksgiving bread keeps things simple so the flavors shine.
dry ingredients
- 4 cups all purpose flour
- 1 packet instant yeast (2 1/4 teaspoons)
- 1 teaspoon salt
- 1/3 cup granulated sugar
wet ingredients
- 1 cup warm milk
- 4 tablespoons unsalted butter, melted
- 2 large eggs, room temperature
optional add ins for flavor
These give your thanksgiving bread personality:
- 1 teaspoon cinnamon
- 1/3 cup raisins or dried cranberries
- 2 tablespoons honey
- Fresh rosemary (for savory versions)
- Orange zest
Pro Tip: If you’re torn between sweet or savory, divide the dough into halves and make one of each.
Step by step instructions
Step 1 – Prepare the dough
Start by grabbing a large mixing bowl. Add the warm milk, sugar, and yeast. Whisk gently until the sugar dissolves. Then let the mixture sit for about 5 minutes. You will know the yeast is activated when a light, foamy layer forms on the surface. This step is important because active yeast is what gives your thanksgiving bread that beautiful rise and pillowy texture.
Once the yeast looks foamy, add the melted butter and eggs. Mix until everything looks smooth and slightly creamy. Now sprinkle in the flour and salt. If you are using a stand mixer, let the dough hook do the work until the mixture starts pulling together into a rough ball. If you are mixing by hand, use a wooden spoon or silicone spatula and keep folding until the dough becomes shaggy and slightly sticky.
At this point the dough will not look perfect, so do not worry. This stage is all about combining ingredients and starting to build structure.
Step 2 – Knead until soft and stretchy
Turn the rough dough onto a lightly floured surface or leave it in the mixer if you are using a dough hook. Knead for 8 to 10 minutes. If you are kneading by hand, press the dough away from you with the heel of your palm, fold it back toward you, rotate it slightly, and repeat. It will slowly become smoother and more elastic.
You want the dough to feel soft, springy, and a little tacky. When you press it with your finger, the indentation should bounce back slowly. This is a sign that the gluten strands have developed enough to give your thanksgiving bread that perfect fluffy texture.
Pro Tip:
If the dough feels dry or cracks as you fold it, add 1 tablespoon of milk and knead it in.
If the dough sticks aggressively to your hands, sprinkle a little flour on top. Add only a tiny amount at a time. Too much flour can make the final loaf dense.
Step 3 – First rise
Lightly grease a large clean bowl with the smallest amount of oil or butter. Place the dough inside, turning it once so the top gets coated. This prevents it from drying out.
Cover the bowl with plastic wrap or a clean kitchen towel. Place it in a warm, draft free spot for about 1 hour, or until the dough has doubled in size. Rising times can vary depending on your kitchen temperature. Warm rooms help your yeast thrive while cold rooms slow things down significantly.
If you want a cool trick to speed up rising, turn your oven on for 30 seconds, switch it off, and place the bowl inside. The gentle warmth is like a spa treatment for the dough.
When the dough has doubled, press your finger into it. If the indentation stays, your dough is ready for shaping.
Step 4 – Shape your thanksgiving bread
Turn the risen dough out onto a clean surface. Gently press out the air to release large bubbles. Now decide how you want your loaf to look. Thanksgiving bread is incredibly versatile and can be shaped in several beautiful ways:
• A simple loaf for everyday slices
• A braided bread for a stunning centerpiece
• Mini rolls for individual servings
• A round boule for rustic charm
If you want that special holiday touch, a three strand braid creates a gorgeous bakery quality look. To do this, divide the dough into three equal pieces, roll each one into long ropes, pinch them together at the top, braid gently, and tuck the ends under. It sounds fancy but only takes a few minutes and looks amazing on the table.
Pro Tip:
If you are adding fillings like cinnamon sugar or herbs, this is the time to incorporate them before shaping.
Step 5 – Bake to golden perfection
Transfer your shaped dough into a greased loaf pan, baking dish, or parchment lined tray. Let it rise again for 20 to 30 minutes. This second rise is crucial because it helps the dough relax and become extra airy.
Preheat your oven to 350°F (175°C) while the dough finishes rising. Once ready, place it on the middle rack and bake for 25 to 30 minutes. The top should turn a warm golden brown and the loaf should sound hollow when tapped on the bottom.
As soon as your thanksgiving bread comes out of the oven, brush the hot surface with melted butter. This gives the crust a soft texture and a beautiful glossy finish that looks straight out of a bakery.
Let your loaf cool for at least 20 minutes before slicing. This helps the interior set so you get clean slices without squashing the crumb.
Tips to make your thanksgiving bread soft and fluffy
- Use warm milk, not hot
- Let the dough rise fully before shaping
- Avoid adding too much flour
- Use room temperature eggs for better dough elasticity
- Knead until you can stretch the dough thin without ripping
Pro Tip: A warm oven that has been turned off is the perfect rising environment.
Variations to try
Want to put your own twist on your thanksgiving bread? Try one of these:
cinnamon swirl thanksgiving bread
Roll out the dough, spread a mix of cinnamon and brown sugar, then roll like a jelly roll. Perfect for sweeter tables or brunch versions.
savory herb thanksgiving bread
Add rosemary, thyme, or sage. This one pairs beautifully with roasted turkey or gravy.
pumpkin thanksgiving bread
Replace part of the milk with pumpkin puree and add a pinch of nutmeg. It’s basically fall in bread form.
What to serve with thanksgiving bread
Pair your bread with:
- Honey butter
- Cinnamon butter
- Cranberry jam
- Herb infused olive oil
- Turkey slices for mini sandwiches
- Warm soup or stews
If you want inspiration for spreads, you can browse flavor pairings on sites like Serious Eats or The Kitchn (keep external links minimal, so choose only one).
Make ahead and storage instructions
One reason this thanksgiving bread recipe is ideal for your holiday planning is how well it stores.
- Make ahead: Prepare the dough, let it rise, shape it, then refrigerate overnight. Bake the next day.
- Freezing: Bake, cool completely, wrap tightly, and freeze for up to 3 months.
- Reheating: Wrap the loaf in foil and warm at 300°F (150°C) for 10 minutes.
Nutrition breakdown
A slice of this bread contains approximately:
- 170 to 190 calories
- 4 to 6 grams of protein
- 28 grams of carbs
- 4 grams of fat
This varies depending on add ins and shaping (rolls vs loaf).
FAQs
Yes. This dough is soft and easy to knead by hand.
You can replace up to 1 cup of all purpose flour with whole wheat. Any more will make the bread dense.
Tent with foil halfway through baking.
Absolutely. Pecans and walnuts work great for fall flavors.
Yes. Thanksgiving is the perfect moment for big batches.
Final thoughts
Thanksgiving is one of the few moments in the year where food becomes a memory. This thanksgiving bread brings warmth to your table, joy to your family, and that unmistakable holiday aroma that makes everyone drift into the kitchen.
Whether you serve it sweet or savory, braided or in a simple loaf, it becomes a little tradition that people look forward to year after year.
If you want to elevate your holiday menu with something homemade, cozy, and crowd pleasing, this is the recipe you keep in your rotation.
10
servings20
minutes2
hours15
minutes180
kcalA soft, fluffy, lightly sweet Thanksgiving bread that fills your home with a warm fall aroma. Perfect for holiday dinners, breakfast, or snacking with butter and jam.
Ingredients
4 cups all purpose flour
1 packet instant yeast (2 1/4 teaspoons)
1 teaspoon salt
1/3 cup granulated sugar
1 cup warm milk
4 tablespoons unsalted butter, melted
2 large eggs, room temperature
1 teaspoon cinnamon
1/3 cup raisins or dried cranberries
2 tablespoons honey
Fresh rosemary
Orange zest
Directions
- Prepare the dough
In a large mixing bowl, combine warm milk, sugar, and yeast. Whisk and let sit for 5 minutes until foamy. Stir in the melted butter and eggs. Add the flour and salt, mixing until a shaggy dough forms. - Knead the dough
Knead on a lightly floured surface (or in a mixer with a dough hook) for 8 to 10 minutes until smooth, soft, and elastic. The dough should bounce back slowly when pressed. - First rise
Place the dough in a lightly greased bowl, cover, and let rise for about 1 hour or until doubled in size. Test by pressing your finger into the dough; the indentation should remain. - Shape the bread
Turn the dough out, gently deflate, and shape as desired: loaf, braid, rolls, or a round boule. Add any fillings (cinnamon, herbs, raisins) at this stage if using. - Second rise
Place the shaped dough into a greased pan or tray. Let rise for 20–30 minutes until puffy. - Bake
Bake at 350°F (175°C) for 25–30 minutes, until golden brown and the loaf sounds hollow when tapped. - Finish and cool
Brush the top with melted butter if desired. Let cool at least 20 minutes before slicing.