Craving something crunchy, fun and totally satisfying for dinner? You’re going to love this version of the classic Japanese-style breaded chicken cutlet, aka chicken katsu. It hits that sweet spot of crispy outside, juicy inside, with minimal fuss and maximum flavor. Let’s dive in.
What is chicken katsu (and why you’ll want it)
The dish known as Chicken Katsu (or simply katsu chicken) originates from Japan. The word katsu is actually a shortening of katsuretsu (カツレツ) meaning “cutlet”. Traditionally it’s pork-based (tonkatsu) but the chicken version is equally delicious and widely enjoyed.
Here’s why it ticks so many boxes:
- The panko breadcrumbs give a light, airy crunch instead of heavy coating.
- It’s flexible, you can serve it with rice, salad, in a sandwich, or alongside veggies.
- With the right prep it’s fast enough for a weeknight meal (some versions ready in ~25 minutes).
- Nutrition note: one serving of chicken katsu can have around 297 calories, ~31 g protein (according to one source).
So yes, it’s indulgent comfort food, but you can lighten it or tweak sides to suit your goals. Let’s get cooking.
Ingredients you’ll need
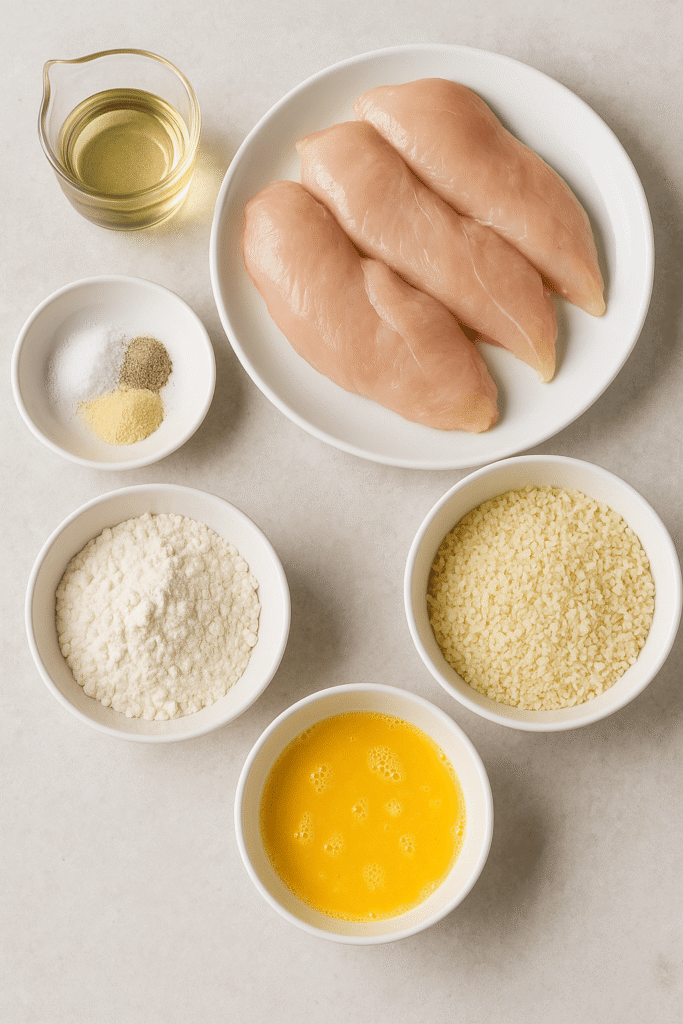
Here’s a typical ingredient list for 4 servings. Feel free to scale up or down.
For the chicken cutlets:
- 4 boneless skinless chicken breasts (or thighs if you prefer juicier)
- Salt and pepper, to season
- Garlic powder (optional for flavor)
- ½ cup plain flour (or rice flour if gluten-sensitive)
- 2 large eggs, beaten
- 1 ½ cups panko breadcrumbs (Japanese-style)
- Oil for frying (vegetable, canola, or light olive, enough for shallow-frying)
For serving:
- Steamed white rice (or brown rice or cauliflower rice for lighter version)
- Shredded cabbage or mixed salad leaves
- Your favorite sauce (see next section)
For the katsu sauce (quick version):
- ¼ cup ketchup
- 2 tbsp Worcestershire sauce
- 1 tbsp soy sauce
- 1 tbsp honey or maple syrup
- A dash of garlic powder + optional chilli flakes
Pro Tip: If you prep the sauce ahead and chill it, it deepens in flavor and makes serving smoother.
Step-by-step method
1. Prepare the chicken
Start with fresh, boneless, skinless chicken breasts (or thighs if you prefer a juicier result). Lay each piece on a sturdy cutting board and, if they’re a bit thick, butterfly them by slicing horizontally through the middle, stopping just before the end. Open the fillet like a book.
Alternatively, place each chicken breast between two sheets of cling film or parchment paper and gently pound it with a rolling pin or meat mallet until it’s about ½ inch (1.3 cm) thick. This ensures the chicken cooks evenly and stays tender.
Pat the chicken dry with a paper towel to remove excess moisture. This is key for achieving that perfect crispy coating. Season both sides with salt, pepper, and a touch of garlic powder or paprika for subtle flavor enhancement.
Pro Tip: For even more flavor, marinate your chicken for 10–15 minutes in a mixture of soy sauce and mirin. It adds umami depth and helps the meat stay juicy.
2. Set up your breading station
Next, prepare your coating assembly line. You’ll need three shallow dishes arranged side by side for easy workflow.
- In the first dish, add flour (about ½ cup) and season lightly with salt and pepper. The flour helps the egg stick to the chicken.
- In the second dish, whisk two large eggs until smooth and frothy. This will act as the binder between the flour and breadcrumbs.
- In the third dish, pour out panko breadcrumbs (around 1 ½ cups). Panko is lighter and flakier than regular breadcrumbs, creating that signature airy crunch.
To coat the chicken, start by dredging each piece in the seasoned flour, ensuring every surface is lightly covered. Shake off any excess flour. Dip the chicken into the beaten egg, turning it to coat completely, and let any extra egg drip off. Finally, press each piece firmly into the panko breadcrumbs, making sure the entire surface is evenly covered.
Gently press the crumbs in with your fingertips so they adhere properly. You should see a slightly textured coating, that’s what creates the crunch.
Pro Tip: Let the breaded chicken rest on a wire rack for 10 minutes before frying. This helps the coating set and stay intact during cooking.
3. Fry the chicken
In a large, heavy-bottomed skillet (cast iron or stainless steel works beautifully), pour in enough oil to cover the bottom about ½ to 1 cm deep. Heat over medium-high until it reaches around 175 °C / 350 °F.
To test, drop in a breadcrumb, it should sizzle and float to the surface. If it browns too quickly, lower the heat slightly.
Carefully place one or two pieces of breaded chicken in the pan at a time. Avoid crowding, as this drops the oil temperature and makes the coating soggy. Fry for 3–4 minutes per side, turning gently with tongs once the underside turns a rich golden brown.
The chicken is ready when it’s crisp, golden, and the internal temperature reaches 75 °C / 165 °F. Remove and place on a paper towel or wire rack to drain any excess oil.
Pro Tip: For a lighter option, air fry at 190 °C / 375 °F for about 10–12 minutes, flipping halfway through. You’ll get a golden crust with much less oil.
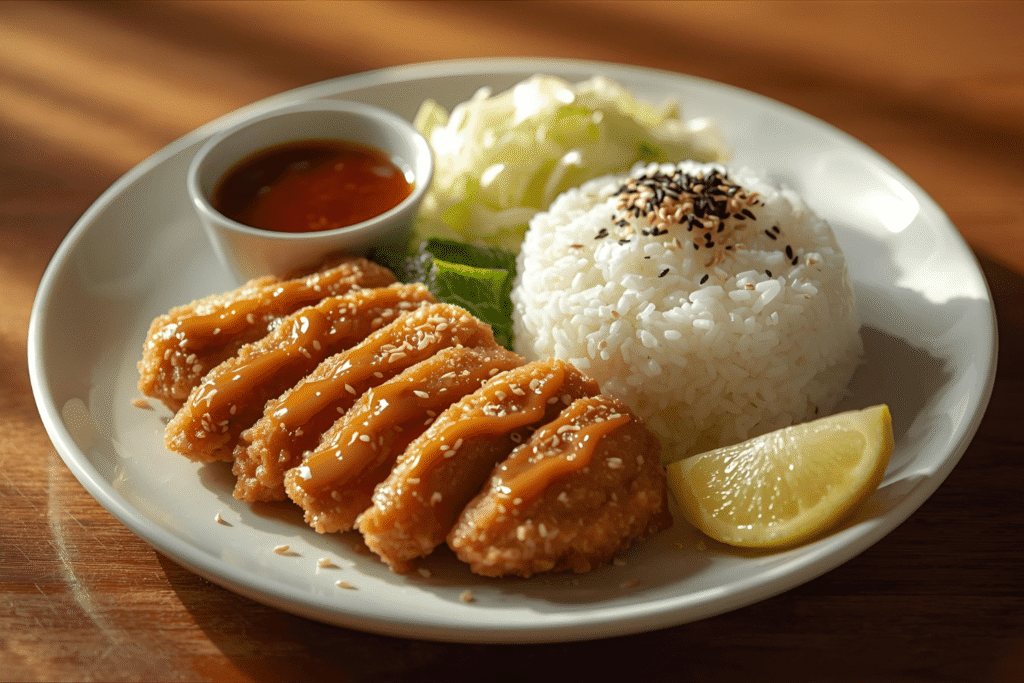
4. Slice and serve
Let the fried chicken rest for 1–2 minutes before slicing. This quick rest keeps it juicy and prevents the coating from separating.
Slice each piece into even strips about 2 cm thick. Arrange the slices neatly over a bed of steamed rice and a side of finely shredded cabbage or salad greens.
Serve with homemade katsu sauce on the side, or drizzle it directly over the chicken for that glossy, restaurant-style finish.
Pro Tip: Use a drizzle bottle or spoon to create neat zigzag lines of sauce across the chicken, then sprinkle with sesame seeds for that Instagram-worthy presentation.
5. Optional finishing touches
Once plated, add small details that make the dish pop:
- Sprinkle toasted sesame seeds or finely chopped green onions for added aroma and color.
- Serve with lemon wedges for a fresh citrus contrast to the rich coating.
- Add Japanese pickles or a quick homemade slaw with rice vinegar and a pinch of sugar for balance.
- For a full Japanese-inspired meal, pair with miso soup or steamed edamame.
Feeling creative? Turn any leftovers into a katsu sando (Japanese sandwich). Place the sliced chicken between soft white bread with shredded cabbage and extra sauce, it’s the perfect lunch the next day.
Pro Tip: To keep your katsu crispy while frying multiple batches, place finished pieces on a wire rack in a preheated oven at 90 °C / 200 °F. It keeps them warm and crunchy without overcooking.
Why this method works so well
- Using thin, even-cut chicken means it cooks quickly and evenly, no undercooked centre or over-browned outside.
- The flour-egg-panko dredging method creates a barrier so the chicken stays juicy and the coating stays crisp.
- Panko breadcrumbs are light and flaky, absorbing less oil and giving that satisfying crunch.
- Shallow-frying in moderate oil lets the coating crisp up without being overly greasy.
- Serving immediately keeps the crisp texture, leftover reheated katsu will still work but you might lose a bit of crunch.
Pro Tip: If prepping ahead, leave the breaded chicken uncovered in the fridge for 10 minutes before frying, this helps the coating adhere and reduces moisture, giving better crisp.
Nutrition and helpful swaps
Here are some nutrition pointers for the dish:
- One source lists chicken katsu at ~297 calories per serving with 31 g protein, 22 g carbs, and 11 g fat.
- Another lists ~282 calories per serving for a simplified version with 31 g protein.
- So you’re getting a solid protein boost (great for muscle tone and satiety) while still enjoying something crispy and comforting.
Swaps to lighten it further:
- Use chicken thighs instead of breast if you prefer more flavor; trade-off, slightly more fat.
- For coating: you could use whole-wheat flour or gluten-free flour, and gluten-free panko if needed.
- For frying: use light oil and limit depth to keep calories in check.
- For sides: swap white rice for cauliflower rice or mixed greens if you’re watching carbs.
- For sauce: reduce sugar/honey or use a light soy-based version to cut down on sweet calories.
Serving suggestions and variations
Here are a few serving ideas to keep things fresh:
- Traditional Japanese style: chicken katsu + steamed white rice + shredded cabbage + katsu sauce.
- Sandwich version: slice the warm chicken and layer in soft bread with lettuce and mayo or spicy aioli, turns into a tasty lunch.
- Bowl version: layer rice or greens, sliced katsu, pickled red cabbage or carrots, and drizzle sauce for a trendy “bowl” meal.
- Veggie-forward: serve with roasted veggies (e.g., broccoli, peppers) instead of rice for a lighter plate.
- Curry version: swap the plain sauce for a warm curry sauce and serve like Chicken Katsu Curry. The dish is originally part of Japanese curry culture.
Pro Tip: Leftovers? They make amazing katsu sandwiches the next day. Just reheat gently in the oven (425 °F/220 °C for ~5 mins) to bring back crispiness.
Common mistakes and how to avoid them
- Too thick chicken → won’t cook through by time coating browns. Fix: butterfly or pound to even thickness.
- Coating peeling off while frying → often due to excess moisture. Fix: dry chicken, press panko gently, don’t overcrowd pan.
- Oil not hot enough → coating soaks up oil and becomes soggy. Fix: test oil with a breadcrumb or crisp-break.
- Waiting too long to serve → coating loses crispness. Fix: serve straightaway, or reheat in oven/air-fryer.
- Heavy side dishes → makes a rich plate even richer. Fix: complement with light salad or steamed vegetables for balance.
FAQs
Yes, you can lightly spray or brush the breaded chicken with oil and bake at ~200 °C/400 °F for 15-20 mins (flip halfway) until golden. You may not get quite the deep crunch of frying but it’s a lighter option.
Panko breadcrumbs (Japanese style) are key. They’re lighter and create more crispiness than standard breadcrumbs. According to food experts, a fresh-panko coating gives the “ethereally light and shatteringly crisp” texture.
Absolutely. Thighs tend to be juicier and more forgiving. Just ensure they’re boneless, skinless and flattened evenly so they cook in the same time as breasts.
Store in an airtight container in the fridge for up to 2 days. To reheat and maintain crispiness, use the oven (~220 °C/425 °F for 3-4 minutes per side) or an air-fryer (~190 °C/375 °F for ~2 minutes per side).
Final thoughts
This katsu chicken recipe gives you the best of both worlds, it’s fun, crunchy, comforting and home-friendly. Whether you’re cooking for a relaxed weeknight dinner, a treat for friends, or meal-prepping a lunch that feels indulgent yet balanced, this dish delivers.
So grab your panko breadcrumbs, a sheet pan maybe for sides, and get ready to dig in. Your taste buds (and maybe your Insta feed) will thank you.
Happy cooking! 🍗

1
serving15
minutes20
minutes700
kcalA crispy, golden Japanese-style chicken katsu served with rice, fresh cabbage, and homemade katsu sauce. Light, crunchy, and full of flavour, the ultimate quick comfort meal for one.
Ingredients
- For the chicken cutlet:
1 boneless, skinless chicken breast (or thigh if you prefer juicier)
Salt and pepper, to season
⅛ tsp garlic powder (optional)
2 tbsp plain flour (or rice flour if gluten-sensitive)
½ large egg, beaten
⅓ cup panko breadcrumbs (Japanese-style)
Oil for frying (enough to shallow fry, approx. 2–3 tbsp)
- For the katsu sauce:
1 tbsp ketchup
2 tsp Worcestershire sauce
1 tsp soy sauce
1 tsp honey or maple syrup
Small pinch garlic powder
Optional: tiny pinch chilli flakes
- To serve:
½ cup steamed white rice
½ cup finely shredded cabbage or salad leaves
1 lemon wedge
Sprinkle of toasted sesame seeds (optional)
Directions
- Prepare the chicken
Place the chicken breast on a cutting board. If thick, butterfly it (slice horizontally and open it like a book) or gently pound it to about ½ inch (1.3 cm) thickness for even cooking.
Pat dry with a paper towel, then season both sides with salt, pepper, and a light dusting of garlic powder. - Set up your breading station
Prepare three small bowls:
1. Flour
2. Beaten egg
3. Panko breadcrumbs
Coat the chicken in flour (shake off excess), dip it into the egg, and press it into the panko so it’s fully covered. Gently press the crumbs on to ensure they stick well. - Fry the chicken
Heat the oil in a skillet over medium-high heat until it shimmers (around 175 °C / 350 °F). Fry the chicken for about 3–4 minutes per side until golden and crisp.
Remove and drain on paper towels or a wire rack. - Make the sauce
In a small bowl, combine ketchup, Worcestershire sauce, soy sauce, honey, garlic powder, and chilli flakes. Stir until smooth. - Slice and serve
Let the chicken rest for 1–2 minutes, then slice into strips. Serve over rice with shredded cabbage and a lemon wedge on the side. Drizzle with sauce or serve it separately for dipping. - Optional finishing touches
Sprinkle sesame seeds for a nutty finish or add a few slices of pickled ginger for colour and freshness.