If you’ve ever wanted a lighter, healthier alternative to regular rice, this cauliflower rice recipe is about to become your new go-to. Whether you’re cutting carbs, eating more veggies, or just curious about food trends, cauliflower rice is the answer. It’s quick, versatile, and honestly tastes amazing when seasoned right.
Fun fact: according to Google Trends, searches for “cauliflower rice” have skyrocketed over the past few years, showing just how popular this veggie hack has become. And there’s a good reason for it, it’s a simple swap that can make everyday meals feel guilt-free without losing flavor.
What is cauliflower rice?
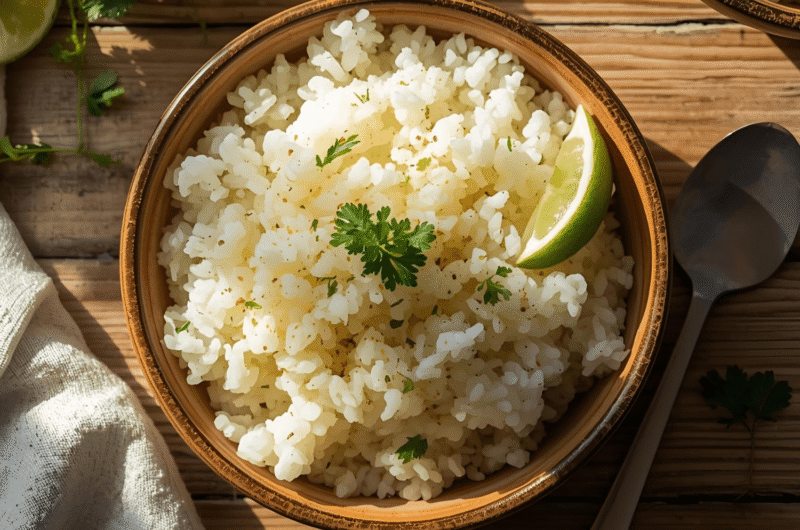
Cauliflower rice is exactly what it sounds like, cauliflower that’s chopped or grated into small, rice-like pieces. Once cooked, it has a soft, slightly nutty flavor that mimics regular rice. The beauty is that you can use it in all the same ways you would use rice, from stir-fries to burrito bowls.
Why you’ll love this cauliflower rice recipe
Health benefits
One cup of cauliflower rice has only about 25 calories, compared to nearly 200 calories in a cup of white rice. That’s a massive difference if you’re trying to stay on track with your goals. Plus, cauliflower is packed with fiber, antioxidants, and vitamin C, making it not just a filler food but a nutrient powerhouse.
Versatility
You can keep it plain as a side, or dress it up with spices, herbs, and sauces. Think of it like a blank canvas that absorbs any flavors you throw at it.
Quick and easy
From start to finish, this recipe takes less than 15 minutes. Perfect for busy weeknights when you want something fast but still healthy.
Ingredients you’ll need

- 1 medium head of cauliflower
- 1 tablespoon olive oil (or avocado oil)
- Salt and pepper to taste
Optional extras: garlic, onion, lime juice, soy sauce, fresh herbs, or spices like turmeric and paprika.
Step-by-step guide to making the perfect cauliflower rice
Prepping the cauliflower
Start with one medium head of fresh cauliflower. The fresher the better, older cauliflower tends to hold more water, which can make the final dish soggy.
- Remove the outer green leaves and cut off the thick central stem.
- Chop the cauliflower into medium-sized florets. Aim for similar sizes so they process evenly.
- Rinse the florets under cool water and then pat them dry very thoroughly. Excess moisture is the number one reason cauliflower rice turns mushy instead of fluffy. If you have time, spread the florets out on a clean towel for 10–15 minutes before processing.
Pro Tip: If you know you’ll be making a large batch, wash the cauliflower the night before and let it dry in the fridge uncovered. The cold air helps draw out extra moisture.
Different methods for turning cauliflower into “rice”
Food processor method (fastest)
- Add the florets into your food processor, filling only about halfway. Overcrowding leads to uneven sizes.
- Pulse in short bursts instead of holding the button down. This gives you better control and prevents the cauliflower from turning into puree.
- Stop when the pieces resemble rice or couscous grains.
This is the best method if you’re short on time or making a big batch.
Grater method (chunkier texture)
- Take a box grater and use the side with larger holes.
- Grate each floret carefully to avoid scraping your knuckles (we’ve all been there).
- The result is slightly coarser, more rustic cauliflower rice that holds up well in soups and stir-fries.
This method is perfect if you don’t have a food processor but want quick results.
Knife method (most effort but zero tools needed)
- Place the florets on a cutting board and use a sharp chef’s knife.
- Chop them finely, rocking the knife back and forth until you reach rice-like bits.
- This takes the longest, but it works great if you’re cooking in a minimalist kitchen or traveling.
Pro Tip: For the most consistent results, combine methods. Start with a knife or grater, then finish in a food processor with one or two quick pulses.
Cooking options for cauliflower rice
Once you’ve got your uncooked cauliflower rice, it’s time to cook it. Each method has its own perks, so choose based on the texture you prefer.
Stovetop (best overall flavor)
- Heat one tablespoon of olive oil, avocado oil, or butter in a large skillet over medium heat.
- Add the cauliflower rice in an even layer. Avoid piling too high or it will steam instead of sauté.
- Season with salt, pepper, and any spices you like.
- Stir occasionally and cook for 5–7 minutes until tender but not mushy.
This method is the most popular because it gives you control, adds flavor from the oil, and keeps the rice fluffy.
Microwave (quickest and easiest)
- Place the cauliflower rice in a microwave-safe dish.
- Cover loosely with a lid or microwave-safe plate.
- Cook for 3–4 minutes on high, stopping halfway to stir.
This is the fastest option, great when you’re meal prepping or rushing through dinner. Just be careful not to overcook, it can get watery.
Oven roasting (best for firm, dry rice)
- Preheat your oven to 400°F (200°C).
- Spread the cauliflower rice evenly on a baking sheet lined with parchment paper.
- Drizzle with olive oil and season lightly.
- Roast for 12–15 minutes, stirring once halfway through.
Roasting is ideal if you want cauliflower rice that’s drier and nuttier in flavor. It’s especially good if you’re using it for meal prep since it keeps a firmer texture when stored.
Pro Tip: For fried rice or grain salad recipes, oven roasting gives you the closest texture to real rice.
Flavor variations and add-ins
This cauliflower rice recipe is just a starting point. Here are some tasty twists:
- Garlic herb: Add minced garlic and fresh parsley.
- Mexican style: Stir in lime juice, cilantro, and cumin.
- Asian inspired: Use soy sauce, ginger, and sesame oil.
- Coconut curry: Cook with coconut milk and curry powder for a creamy side dish.
How to store and reheat cauliflower rice
- Fridge: Store in an airtight container for up to 4 days.
- Freezer: Spread uncooked cauliflower rice on a baking sheet, freeze, then transfer to a bag. Lasts up to 2 months.
- Reheat: Sauté in a skillet for 3–4 minutes or microwave for 1–2 minutes.
Pro Tip: Freezing raw cauliflower rice prevents it from turning soggy compared to freezing after cooking.
Nutrition facts and health perks
Here’s what you get in one cup of cooked cauliflower rice (approximate):
- Calories: 25
- Carbs: 5g
- Fiber: 2g
- Protein: 2g
- Vitamin C: 77% of daily needs
That’s pretty impressive for a veggie that feels like comfort food. Studies show that replacing refined carbs with vegetables like cauliflower can help with weight management and blood sugar control (Harvard source).
Serving ideas
Wondering how to use your fresh batch of cauliflower rice? Try these:
- As a side for chicken, salmon, or tofu
- In burrito bowls or taco nights
- As the base of a Buddha bowl
- Mixed into soups and stews
- With stir-fried veggies for a quick meal
Pro tips for the best cauliflower rice
- Dry it well after washing, moisture = soggy rice.
- Season generously, cauliflower needs flavor, so don’t be shy with herbs and spices.
- Cook in small batches so it doesn’t steam and lose texture.
- Use high heat for stovetop cooking to keep it light and fluffy.
Common mistakes to avoid
- Over-processing in the food processor, it turns into mush.
- Using too much oil, cauliflower rice absorbs it quickly.
- Overcooking, it only needs a few minutes to soften.
FAQs
Not exactly, it has a mild, nutty flavor. But when seasoned, it works well as a substitute in most dishes.
Yes! It’s low in calories and carbs while being high in fiber and vitamins. It’s a great swap if you want to add more veggies to your diet.
Absolutely. Use a box grater or chop finely with a knife. It just takes a bit more effort.
Pat it dry before cooking and avoid overcrowding the pan. High heat also helps.
Definitely! You can store uncooked cauliflower rice in the fridge for up to 4 days or freeze it for up to 2 months. If you’re meal prepping for the week, it’s best to keep it raw until you’re ready to cook so it doesn’t lose texture.
Yes, and it’s a great hack if you want to reduce carbs without giving up regular rice completely. Mixing half-and-half still gives you the familiar rice texture while cutting down calories and adding extra nutrients.
Final thoughts
This cauliflower rice recipe is proof that eating healthy doesn’t have to be complicated or boring. In just 15 minutes, you can whip up a side dish that’s light, delicious, and versatile enough for any cuisine.
Whether you’re making it for weight management, clean eating, or just to sneak more veggies into your meals, cauliflower rice is a trend worth keeping in your weekly routine. Try it once, and chances are it’ll become a permanent staple in your kitchen.
1
serving10
minutes5
minutes80
kcalA quick and healthy cauliflower rice recipe that’s low-carb, flavorful, and ready in just 15 minutes. Perfect as a light side dish or rice substitute.
Ingredients
1/4 medium head of cauliflower (about 150g)
1 teaspoon olive oil (or avocado oil)
Salt, to taste
Freshly ground black pepper, to taste
Directions
- Remove the leaves from the cauliflower and cut 1/4 of the head into florets.
- Rinse and pat dry thoroughly with a clean towel to avoid excess moisture.
- Pulse the florets in a food processor until they resemble rice (or use a grater/knife if preferred).
- Heat olive oil in a skillet over medium heat.
- Add the cauliflower rice, season with salt and pepper, and sauté for 5 minutes until tender but not mushy.
- Adjust seasoning, garnish with herbs or lime juice if desired, and serve immediately.